
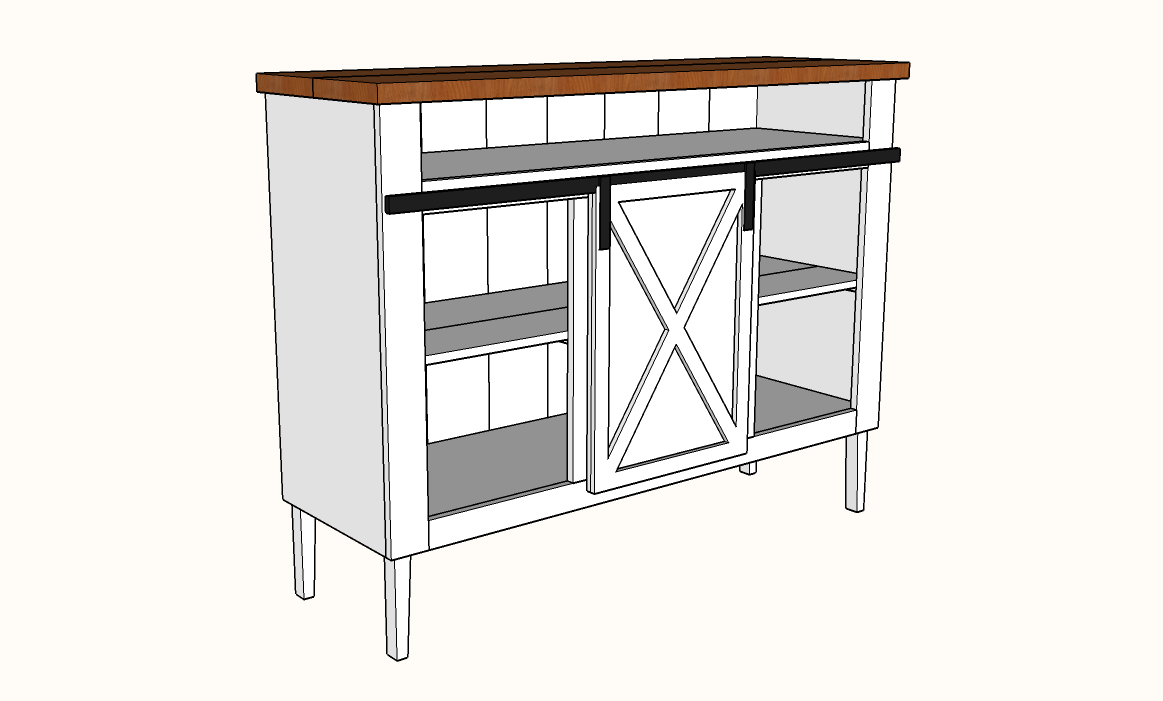
Our 70″ Grandy sliding door console has become quite popular, and we’ve gotten quite a few requests for varying sizes of this design. Here is a 60″ version that still includes three bays with a central sliding door. The shopping list for this 60″ version of the Grandy sliding door console stays pretty much the same, you’ll just have a little more scrap left over at the end of the built.
Materials:
- 2 – 2×10 at 6 feet long
- 1 – 1×8 at 6 feet long (or 2 if you want the floor to be boards instead of plywood)
- 1 – 1×10 at 6 feet long (or 2 if you want the floor to be boards instead of plywood)
- 1 – 4′ x 8′ sheet of 1/4″ thick plywood or hardboard (for back)
- 3 – 1×2 @ 6 feet long
- 4 – 1×4 @ 6 feet long
- 6 – 2×3 @ 6 feet long
- 1 – 4′ x 8′ sheet of 3/4″ plywood
- Wood screws
- Nails
- Hardware for sliding doors – You can buy the hardware for sliding doors, or you can make your own. I made my own for my rustic barn wood dog crate.
Tools:
- Saw: circular, miter, and/or table saw.
- Drill / Driver
- Nail Gun or hammer
- Kreg jig
- Sander and sandpaper
- Square
- Tape Measure
- Wood glue

Step 1: Build the upper and lower frames
Start by assembling your assembling your upper and lower frames. These are made out of 2x3s, and are identical. Use wood glue and 2 1/2″ wood screws for all joints. The supports in the middle are each 14″ wide, and should be spaced 17″ apart – but they don’t have to be precise since they will be hidden in the final design

Step 2: Add the plywood sides
Cut your two sides from the 3/4″ plywood sheet. These are each 36″ high, by 17 1/4″ wide. Note that these will be 1/4″ wider than the frames so that you can let that 1/4″ overhang the back edge and will conceal the outer edges of the back panels we’ll add later.
I like using 16 gauge nails and wood glue. The glue itself, if applied correctly, will provide a much stronger bond than any mechanical fastener. So the nails are really just holding it in place until the glue dries.
Note: Now is a good time to check to ensure the piece is square, before moving onto the face frame.

Step 3: Attach the face frame
My face frame design is just slightly different than what Ana shows in hers. For mine, the rails are continuous across the entire top and bottom instead of being separated by the middle stiles. I just prefer this look, as it looks more like a finished cabinet to me. The upside of Ana’s design is that it allows you to nail the middle stiles directly to the frames instead of having to use a Kreg jig and pocket screws.
That said, the face frame is made out of 1 x 4 boards. I’d prefer to actually build mine like an actual cabinet face, using mortise and tenon joints; or at worse pocket hole screws.

Step 4: Floor and front shelf supports
Again, differing from Ana’s plan, my sliding door console plan shows to use a 17×57″ piece of 3/4″ plywood instead of a 1×8 and a 1×10 like the middle shelf (see step 5). Wood glue and a few nails can hold this in place.
The four 14″ vertical shelf supports, made from 1x2s, are glued and attached to the backs of the face frame. The two outer ones should be pushed flush to the cabinet sides, while the two middle ones are centered on the face frame boards.

Step 5: Build and attach the shelf
The shelf in these sliding door console plans consists of a 1×8 and a 1×10 both cut to 57″ in length and then held together by four 17″ horizontal shelf supports made from 1x2s. When building, make certain the horizontal shelf supports are aligned over the vertical supports installed on the last step. The shelf should be resting on the horizontal supports, not the 1×8.
Once the shelf is in place in the cabinet, attach the outer horizontal shelf supports to the cabinet sides using 1 1/4″ wood screws or nails.

Step 6: Rip and attach plywood back planking
When you are ready to install the back planking, you have two options:
- Make all of the planks the exact same, which means cutting eleven boards at 7 1/8″, or
- Make the boards varying widths for a more rustic/reclaimed look.
In either case, you will install them the same. Use wood glue and nails (or staples) at the top and bottom of each board to attach to the frames, and also secure the middle of the planks to the middle shelf to provide more structural integrity to the entire piece.
Note: it’s also a good practice to ensure the back of the piece is still square before you start attaching the planks.

Step 7: Bottom Trim
The bottom trim is made of 1×2 stock that is standing on the narrower edge, cut with 45 degree miters. Simply glue and nail it on.

Step 8: Top
The next step is attaching the top. This consists of the two 2×10 boards, cut down to 60″. Align them flush with the back of the piece, and overhanging each side by 3/4″. To hide the fasteners, use a Kreg jig and pocket screws from underneath going through the upper frame. Alternatively, you could use 4″ wood screws going straight up through the upper frame as well. For the second method, I definitely recommend pre-drilling the holes and even countersinking them to better hide the screw heads.

Step 9: Door and sliders
The simplest way to build the door is to start by cutting a 20×30″ piece of 1/2″ plywood, and then laying 1 or 1 1/2″ strips around the edges and in an X pattern. Though how you build the door is really what will add your custom touch to this piece, so feel free to experiment. Just remember to keep it at 20×30″.

After you have your door built, you just need to attach it to your barn door sliders and your console is ready for finishing. Again, you can buy the hardware for sliding doors, or you can make your own. I really enjoy making my own because it definitively gives a more rustic or antique feel to the piece.
If you have comments or question, please feel free to connect with us via the comments section below or use our Contact Form. We love the feedback! Also, don’t forget to check out our other free DIY furniture plans.

* This post may have affiliate links, which means I may receive commissions if you choose to purchase through links I provide (at no extra cost to you). As an Amazon Associate I earn from qualifying purchases. Thank you for supporting the work I put into this site.
Discover more from Famous Artisan
Subscribe to get the latest posts sent to your email.
What are the middle boards on the face frame measure?
JD,
The face frame mide board lengths should be 29″ if you are using 1×4 stock for the outside of the frame. Since the total height is 36″, and the actual width of a 1×4 is 3.5″. 36-(2×3.5) = 29
Hope this helps and let me know how the build turns out!
About how long would you estimate this takes to build?
Jana, it really depends on how comfortable you are with the different tools and techniques but in general I would anticipate a long weekend to get it complete.
Hello, I am getting ready to make the Grandy Sliding Door Console, 60″ version, which by the way, the plans are just amazing! and I have been looking for something like this for a long time and looking forward to make. Question, I am planning on using two sliding doors, but wanted to know if you have plans for the middle shelf to be a wine rack? I am making this for my dining room and wanted to see if I can make use for this idea. Thanks in advance and looking forward to hearing your response. Love the site.
Thanks and sincerely,
Mike.
Mike, I’m glad you like the plans and the site. I really like the idea of a wine rack in middle section, I hadn’t thought of that before. Are you picturing a standard X based design to hold the bottles, or more like shelves with dividers? Let me know and I’d be happy to modify the designs for you.
Would it possible to get a plan like this for a 60x14x32 inch console? I have an odd space that I’m trying to fill. I could take this plan and make adjustments accordingly for the height and width, but im confused about the doors, I don’t think 2 @ 20 inches wide would look right, am I wrong in thinking I would need 2 @ 18.25 inches to have them even spaced in front of the 1x4s of the face frames. Great work by the way, Ive been wanting to tackle one of these for a while now. Trying to gather the necessary wood to get it started fairly soon,
Jake,
First, I’m glad you are enjoying the site. For the doors, you are correct in that 18 1/4″ would wind up centered on the 1x4s. Of note, I’m actually in the middle of posting another design for the 60″ which does have two doors and a wine rack in the middle bay. As I was drawing this up, I didn’t like the look with two doors and the 1x4s, so I changed the middle two 1x4s to be 1x3s and offset them from center slightly to accommodate the wine rack. I also wound up drawing in 19″ doors as I didn’t think the doors needed to be centered on the 1×4 and 1×3 because those boards would be hidden. Look for that post in the next day or so, and let me know your thoughts on that design in regards to having two doors.
I just seen that design, your skills are making my life easier, I appreciate it very much. I will take the design with the two doors and the wine rack and make that work, Ill just do the normal shelves instead of the rack in the middle. Or maybe I should take up wine drinking, haha since that looks amazing, Now I just need to actually do it and stop looking for excuses to avoid it. Thanks again for the great work!
Let me know if you have any questions, and how it goes.
Hello! Do you have more detailed instructions for building the doors? Like the measurements and angles to cut for each piece of the frame and the X
Jenn,
I could give you angles for these, but really they are such strange angles (like 64.4 degrees) that it is easier to do it in the following manner.
For a 20″ wide x 30″ high door, after you cut the 1/2″ sheet of plywood for the back you’re going to want to cut
– two 30″ strips for the sides
– two 17″ strips for the top and bottom pieces
– two 33″ strips for the X pieces (which you’ll cut down later).
All of these strips are 1 1/2″ wide.
Attach your four outer strips first. Now lay your first X piece from corner to corner and using a pencil and a straight edge mark where that piece crosses over the four outer pieces. Then cut along your pencil lines. Now glue and attach that piece.
Then, do the same for the other X piece, but note you’ll also have to cut out a strip in the middle where it crosses over the first X piece.
Let me know if you need more help, or would like that in pictures. I’m happy to assist.
The link for the hardware is unavailable on Amazon. Would I need to purchase a 5 ft. kit? Like this? https://www.amazon.com/SMARTSTANDARD-Hardware-Smoothly-Installation-Instruction/dp/B07NYNYHZY/ref=sr_1_4?keywords=sliding+barn+door+hardware+5ft&qid=1575688312&s=hi&sr=1-4
Katie, yes. That 5 ft kit should work for a 60″ console. You may need to trim it down a bit since the body of the console is 2″ shorter than the top (58″). Otherwise it will extend past each side of the body by 1″.
Hello, I have been searching a long while for plans like this with the size needed. The only thing that I’m going to change is to install hinged doors on each end while keeping the sliders. That way it will cover everything inside if needed. Just wondering your thoughts on the idea? Thanks for the great plans.
Troy, you could absolutely add hinged doors for the outer bays. Just remember that you need to have the doors inset (as opposed to sitting on the face frame) in order to allow the sliding door clearance.
I’d love to see how it turns out when you are done!
Hi:) my wife wants a 40”x 36” x 34 to use in kitchen as counter and she fell n love with your plan
Can u help me with needed measurements to do this??
I have had problems in that planing department especially since I got head damage during Vietnam war but still love woodworking
If needed I will pay for your time an help.
She wants these badly an wants done ASAP lol
Please let me know
God bless
David,
Thank you for your service.
I’d be happy to create plans for you at those dimensions. Question first though, at 40″ wide is that 36″ high or deep?
Also, would your wofe like it with two bays (each around 17″ wide), or three bays (each around 10″ wide).
Thank you so much for these plans! I’d love to share my project with you but can’t attach a photo here! Email? A great project to kick off this quarantine.
-Laura
Laura, I’m so glad the plans helped you build your own. I’d love to see the final version! If you go to this page: https://famousartisan.com/submit-your-build/, you should be able to create an account and load some pictures.
I’m so excited to finally find a design for the size I need without all those darn pocket holes (which I despise). I can’t wait to start building it.
Thank you
I want to create a bar type sideboard that will house a wine fridge. I need a 3 compartment, 2 doors setup with at least a 20-22” depth. 60-72” for the length is fine. Would you be able to draw up plans for me?
Cody, I can draw that up for you. What length do you want it? Also how tall? If you have a wine fridge already, knowing those dimensionswould help.
Hi, I love this plan, but I’m making it for my daughter who has modifications. She would like an open shelf above the barn door cabinet. She also needs legs added to raise it above a radiator – approx 9 inches. Total height can be up to 46 inches. Could you please help me with the modifications?
Thanks,
Cindy
Cindy,
I’d be happy to draw something up for you. It’ll probably take me a few days, and I’ll send an initial drawing for your review before I write the whole thing up with directions.
Cindy,
Is the below kind of what you had in mind? If so, I can draw up the plans. If not, let me know what you want adjusted.