
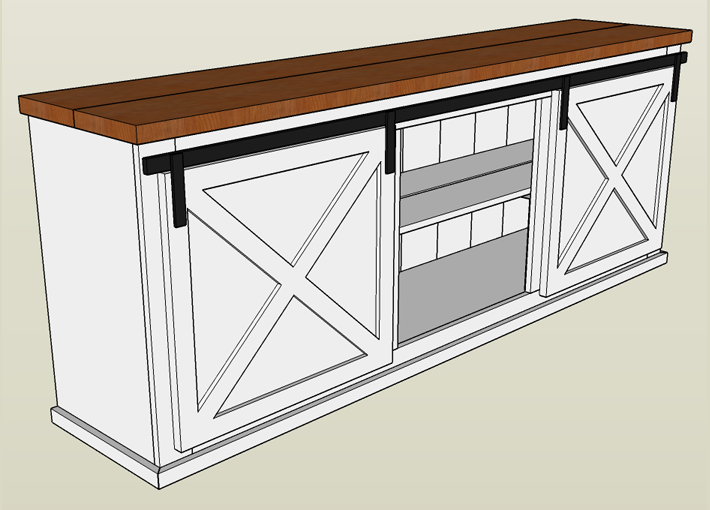
Looking for plans to build a DIY sliding door console? Are you in love with the sliding barn door farmhouse look? Then you might just love these three bay, 70″ sliding door console plans – or check out one of our other sliding door console plans.
Materials:
- 2 – 2×10 at 6 feet long
- 1 – 1×8 at 6 feet long (or 2 if you want the floor to be boards instead of plywood)
- 1 – 1×10 at 6 feet long (or 2 if you want the floor to be boards instead of plywood)
- 1 – 4′ x 8′ sheet of 1/4″ thick plywood or hardboard (for back)
- 1 – 4′ x 4′ sheet of 1/2″ thick plywood (for the door)
- 3 – 1×2 @ 6 feet long
- 4 – 1×4 @ 6 feet long
- 6 – 2×3 @ 6 feet long
- 1 – 4′ x 8′ sheet of 3/4″ plywood (for the floor)
- Wood screws
- Nails
- Hardware for sliding doors – You can buy the hardware for sliding doors, or you can make your own. I made my own for my rustic barn wood dog crate.
Tools:
- Saw: circular, miter, and/or table saw.
- Drill / Driver
- Nail Gun or hammer
- Kreg jig
- Sander and sandpaper
- Square
- Tape Measure
- Wood Glue (I’m a fan of Titebond)

Step 1: Build the upper and lower frames
Start by assembling your assembling your upper and lower frames. These are made out of 2x3s, and are identical. Use wood glue and 2 1/2″ wood screws for all joints.

Step 2: Add the plywood sides
Cut your two sides from the 3/4″ plywood sheet. These are each 36″ high, by 17 1/4″ wide. Note that these will be 1/4″ wider than the frames so that you can let that 1/4″ overhang the back edge and will conceal the outer edges of the back panels we’ll add later.
I like using 16 gauge nails and wood glue. The glue itself, if applied correctly, will provide a much stronger bond than any mechanical fastener. So the nails are really just holding it in place until the glue dries.
Note: Now is a good time to check to ensure the piece is square, before moving onto the face frame.

Step 3: Attach the face frame
My face frame design is just slightly different than what Ana shows in hers. For mine, the rails are continuous across the entire top and bottom instead of being separated by the middle stiles. I just prefer this look, as it looks more like a finished cabinet to me. The upside of Ana’s design is that it allows you to nail the middle stiles directly to the frames instead of having to use a Kreg jig and pocket screws.
That said, the face frame is made out of 1 x 4 boards. I’d prefer to actually build mine like an actual cabinet face, using mortise and tenon joints; or at worse pocket hole screws.

Step 4: Floor and front shelf supports
Again, differing from Ana’s plan, my sliding door console plan shows to use a 17×67″ piece of 3/4″ plywood instead of a 1×8 and a 1×10 like the middle shelf (see step 5). Wood glue and a few nails can hold this in place.
The four 14″ vertical shelf supports, made from 1x2s, are glued and attached to the backs of the face frame. The two outer ones should be pushed flush to the cabinet sides, while the two middle ones are centered on the face frame boards.

Step 5: Build and attach the shelf
The shelf in these sliding door console plans consists of a 1×8 and a 1×10 both cut to 67″ in length and then held together by four 17″ horizontal shelf supports made from 1x2s. When building, make certain the horizontal shelf supports are aligned over the vertical supports installed on the last step. The shelf should be resting on the horizontal supports, not the 1×8.
Once the shelf is in place in the cabinet, attach the outer horizontal shelf supports to the cabinet sides using 1 1/4″ wood screws or nails.

Step 6: Rip and attach plywood back planking
When you are ready to install the back planking, you have two options:
- Make all of the planks the exact same, which means cutting eleven boards at 6 3/32″, or
- Make the boards varying widths for a more rustic/reclaimed look.
In either case, you will install them the same. Use wood glue and nails (or staples) at the top and bottom of each board to attach to the frames, and also secure the middle of the planks to the middle shelf to provide more structural integrity to the entire piece.
Note: it’s also a good practice to ensure the back of the piece is still square before you start attaching the planks.

Step 7: Bottom Trim
The bottom trim is made of 1×2 stock, cut with 45 degree miters. Simply glue and nail it on.

Step 8: Top
The next step is attaching the top. This consists of the two 2×10 boards, cut down to 70″. Align them flush with the back of the piece, and overhanging each side by 3/4″. To hide the fasteners, use a Kreg jig and pocket screws from underneath going through the upper frame. Alternatively, you could use 4″ wood screws going straight up through the upper frame as well. For the second method, I definitely recommend pre-drilling the holes and even countersinking them to better hide the screw heads.

Step 9: Door and sliders
The simplest way to build the door is to start by cutting a 22×30″ piece of 1/2″ plywood, and then laying 1 or 1 1/2″ strips around the edges and in an X pattern. Though how you build the door is really what will add your custom touch to this piece, so feel free to experiment. Just remember to keep it at 22×30″.
After you have your door built, you just need to attach it to your barn door sliders and your console is ready for finishing. Again, you can buy the hardware for sliding doors, or you can make your own. I really enjoy making my own because it definitively gives a more rustic or antique feel to the piece.
If you have comments or question, please feel free to connect with us via the comments section below. We love the feedback! Also, don’t forget to check out our other free DIY furniture plans.
After your done building something inspired by any of our plans we’d love for you to share your results by submitting your build.

* This post may have affiliate links, which means I may receive commissions if you choose to purchase through links I provide (at no extra cost to you). As an Amazon Associate I earn from qualifying purchases. Thank you for supporting the work I put into this site.
Discover more from Famous Artisan
Subscribe to get the latest posts sent to your email.
Hi. I think this is an awesome build but I need help with plans for a 60″ version to fit in the space my wife and I would like to have it in. Any way you could help me out with a cut list for this size project? Thanks for your help and time.
Reuben,
I’d be happy to help you out and draw up the plans and figure out the cut list. It’ll take me a few days, but I can create a new post when it’s ready.
Are you picturing 3 bays, so each bay is just a little narrower to make it down to 60″?
Brian,
Yes that would be GREAT!!! My wife and I greatly appreciate you taking the time.
Reuben, here’s a 60″ version for you: http://famousartisan.com/grandy-sliding-door-console-60-version. The shopping list is going to stay the same, and the diagrams contain all of the specs for each of the necessary cuts. Feel free to reach out should you have any questions.
Brian,
Thank you very much for this. Can’t wait to get started on this project.
Brian,
Would this plan work with 2 doors as well?
Reuben, don’t you mean regular hinged doors or two sliding doors? Two hinged doors would be simple. For two sliding doors, they would simply need different tracks (think of a close with sliding doors) so that one could slide in front of the other.
Also, I have the plans with one sliding door drawn and hope to post tonight. I can always alter it from there if you need or would like changes
Brian,
Yeah my wife mentioned how she would like to put two sliding doors instead of the one. How would the install of the tracks work on the 60″ version?
Sorry Reuben, I was confusing projects. If you wanted two doors on three bays, you could do that on one track. It would just mean only one bay could be open at any give time. For example, you would either have both doors on the outside or you would have one door on the outside and one in the middle.
Brian,
Ok got it. Thank you so much again. You have been a great help.
I am building this exact size right now, can I do two doors? I just saw your 72 inch version with two doors and now I am wondering if I messed up building this one.
Kaitlyn, you can easily change this design to have two doors instead of one, or four bays instead of three. The only real difference is in the number of stiles in the face frame. If you want four bays instead of three, just add an extra stile and make certain they are all spaced equally across the front. Then adjust the width of your doors to match the measurement from the center of one stile to the center of the next stile.
Brian, both the 70″ and 60″ plans look fabulous and I appreciate you posting these. Could you help me and my wife out on making this a 48″ stand instead? Thinking 2 bays instead of 3. Thanks for all of your posts! Very informative!
Tyler,
I’d be happy to help. So two bays, with one sliding door that will be covering either one side or the other?
That would be perfect, unless you think 3 bays would still work with it. I’m just afraid that with 3 bays, it would be too tight. Thanks for your help, Brian!
I would agree that 3 bays in a 48″ wide console would be too narrow. I’ll see what I can draw up for you in the next few days.
Thanks, Brian! Can’t wait to see the plans!
Tyler,
We just posted the plans for the 48″ version here: http://famousartisan.com/48-inch-sliding-door-console-plans/
Best of luck! Let us know if you have any questions, and also feel free to send us pictures of what you build when it is done!
I am new to woodworking but have some experience with tools. I was wondering if you could help me out with plans for a 14in x 74in x 32in version? Four bays two doors preferred. Please and thank you.
Ryan, I can definitely help you with the plans. It may take me a week or so because I’m going out of town for a few days. I’ll post it here once I have it ready or let you know if I have questions.
Thank you!
Ryan,
I just posted the plans for your 74x32x14 sliding door console. You can find them here: http://famousartisan.com/sliding-door-entertainment-console-74-x-32-x-14/
Thank you!! I cannot wait to get started.
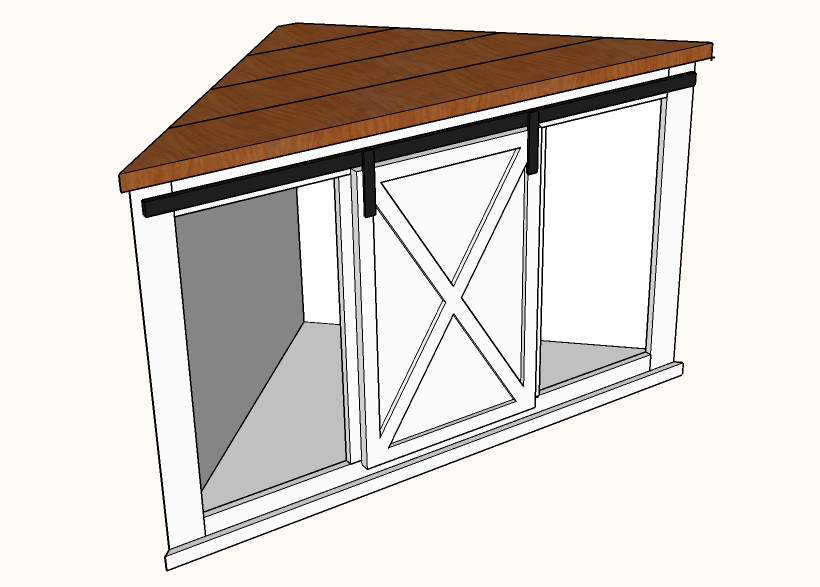
Do you have plans for a corner version?🤞🏻
I don’t at this point, but could probably draw some up fairly easily. Assuming a 70″ front, and an equilateral triangle, i believe that makes each side 49.5″. Does that sound like what you would like?
This is conceptually what a corner version would look like. I could modify it for you if you provided dimensions for the front width.
Id totally be down with plans for this corner unit also dude.
Matt, I’d be happy to draw that up for you. Do you know how long you want the front edge per chance?
I would imagine somewhere in the area of about 60″ would be a safe number to work with for a corner unit. Should leave you with an easy square area to work with.
I would love plans for this corner one!
I was hoping you could help me out with plans for a 3 bay with 2 doors at 36 x 84 x 18 or close to those as possible. Thank you Deanna
Deanna, I can try to create a custom view that size for you in the next few days. I’ll send you another response when it is done.
Deanna,
Was this what you were picturing for 84x36x18, with 2 doors across 3 bays?
What kind of wood do you recommend for this project?
Jeannie,
A lot of our designs are based upon using standard dimensional or construction lumber (2x4s, 2x6s, etc…) to make it easy for the standard DIY’er. Though I’d actually recommend going to a local lumber yard instead of a big box home improvement store, as the local lumber yards typically have a higher grade of construction lumber.
It also depends on how you want to finish the project. If you are painting, your wood doesn’t have to be as nice as if you are going to stain it. If you have more specific questions in mind, I’m more than happy to help answer them for you.
Any chance you would be able to adjust the plans to include two hinged doors with window and panes instead of the sliding barn door while also adding in having the bays separated so that nothing can get inside it? I want to display things but I don’t want my cats getting to them.
Phil, I should be able to draw something like that up. Are you still wanting 70″ wide and 4 bays?
If at all possible I would like 60x32x12 with 3 bays but only two doors. Three doors would be fine too though.
I should be able to do those dimensions and two doors. Give me a few days to draw it and write it up and I’ll post it to the site for you.
Sounds great!
Phil,
Below is a quick glimpse of where I am so far, but I have a few questions before I finish it for you.
1. Do you want the doors inset so they are flush with the frames, or onset so they sit on top?
2. Do you want shelves (and how many) in each of the bays?
3. Any other thoughts in regards to the design so far?
I would like the doors onset. And I’m thinking two shelves for each bay. The design looks great! But I was thinking, would it be too much to make the height 36inches instead of 32?
Phil,
Check out these new glass door console plans and let me know if you have any questions. And send us a pic after you get it built. I’d love to see the finished product!
Thank you and will do!
Hello, I am unsure what size I will need yet, but about how much can someone expect to pay for this project?
Hannah, buying the hardware typically costs about $40. The biggest factor that determines your total cost is the type of wood you choose. Using standard construction grade wood will keep the price down, but you’ll still pay about $45 per sheet for decent 3/4″ plywood. Overall, I’d say expect to spend about $250 – $350 on materials to build one of these consoles.
Did you rip your 2x10s to make it more square? Usually most projects use douglas fir which have a slightly rounded edge.
Cody, you can rip the 2x10s if you prefer a squared joint. Though you’ll lost about a 1/4″ per edge you rip off. So you could wind up losing up to an inch in width which will affect the size of the top. I’d recommend only ripping down the inside edges and leaving the outsides rounded since you’d most likely being rounding the outside edges anyway.
Personally, I do not rip them off because I don’t mind the look of the rounded edges once the piece is finished.
Would you be able to give me measurements for this just adjusting the depth to 14-15 inches? Same height and length as this unit. Thank you
Would you prefer 14 or 15″ deep? And would that be for the cabinet, doors, or the top itself?
15 would be good measuring the depth of the top
Bibi,
I just posted an updated set of console plans that should fit your need of the top measuring 70″ wide by 15″ deep. The changes are fairly simple, but let me know if you should have any questions or require any clarifications. And I’d love to see your finish piece if you want to share pictures when it is complete!
Thank you! I will share pictures once we complete it!
Do you think this could hold up an 800 lb aquarium?
Alex, I would not expect it to hold an 800 lb aquarium as it is designed. Off the top of my head, I would at a minimum add vertical 2×4 supports inside all four corners attaching the two frames built in Step 1. This would hold the load instead of the 3/4 plywood. You would probably also need 2×4 supports behind the center stiles of the face frame and in the back of the cabinet to held prevent sag from the load, depending on where the corners of your tank sit.
Could you provide plans for this console with dimensions 72Lx48hx24w? Preferably with 4 bays and two doors. Thank you!
Abbey, I’d be happy to modify the plans for you. Give me a few days and I’ll post them for you.
Abbey,
I just posted a new set of plans for the dimensions you requested. Please let me know if you have any questions, and send us a few pics of your finished build when you have it complete
My wife and I are going to build this plan. my question is can I add two doors with this paln
Ismael, you can absolutely have two doors on this plan. Just remember if you are buying the hardware you need to get attachments for two doors!
And we’d love to see how your project turns out. Please send us some pictures through the Submit Your Build page when you are done.
Can you provide this plan with the height of 33 inches and two sliding doors
Can you please provide this plan with 33 inches in height with two sliding doors thank you
Ismael, I can make those changes for you. It will take a few days. If you’re subscribed for updates, you should get a notification when they are posted.
Thank you
My husband and I want to build this console can you please provide plan for us 70Lx30Hx18W. With two sliding doors. Thank you in advance.
Natalie, I can work on this design as well. If you subscribe to our site for updates you should get a notification when I have posted it in the next few days.
Thank you Brian
Love your site! What wood would you really recommend using for this console project? Also – would a 6ft long barn door track fit the 70 inch console or would I need to cut the track? (Track listed here: https://www.amazon.com/dp/B07MTXGJKF/ref=cm_sw_r_cp_api_i_eZSXEbKHKD93Z
Thank you!
Rachel, for the track, 6ft = 72inches. So you’d probably have to trim about 2″ off of each end of the track for it to fit without overhang.
For wood, it depends on if you are going to paint or stain it. If you are going to paint it you can use a lot of the “construction lumber” and birch plywood. If you want to stain it, for any of the pieces that are readily visible you may want to choose more expensive wood like oak, or even just the nicer pine.
Thank you! Very helpful!
Could you do a corner farmhouse stand? Looking for plans for that!
Katie,
Do you mean like this: https://famousartisan.com/66-sliding-door-corner-console/
If you are thinking of something else, can you send us a picture?
Can you please help?? We are having issues with the sliding door hardware…..the top piece across the top is made 1×4 lumber which is 3 1/2 inches… every mini barn door kit says I need a minimum of 3 1/2 inches from top of door to to my top….if that’s the case I can’t have my door overlap my opening at all. Is this normal? Figure my doors should overlap my openings by at least 1/2 inch but I only have 3 1/2 inches.
James,
If you look at the images for the Winsoon kit (https://amzn.to/2Z3DU4c) it recommends 3 1/2″ above the top of the door, but it also shows it really only needs 2 4/5″ from the top of the door to the top of the rollers. So you shouldn’t have any problems with having them function as needed even if you do have a 1/2″ overlap of your door. That cuts it close (1/5″), but it should still roll. You may just need to put the doors on before attaching one of the side brackets.
Question! Could you help me do designs for one 72” long 24”wide, and 39” tall? I want to be using 1x12s for the top and shelves as well as the bottom, plywood for the back. 2x4s for the frame. 1x4s for the doors with 1×2 framing and crosses on the doors. I know the basic concept of what i want. Just don’t know how to make it into workable figures for me! Thank you in advance!
Nicholas, I can draw that up for you. Give me a few days and then I’ll post it.
Nicholas,
One issue with your idea of using 1x12s for the top for a 24″ wide piece. A 1×12 is actually only 11 1/4″ wide. So two of them would only be 22 1/2″ wide. I can adjust the plan to be 22 1/2″ wide, or I can draw it up with 3 boards (one 1×10 and two 1x8s) as the top. Let me know which way you would want to go, or if you have a different thought.
Would it be possible to draw up a plan for a 48”L x 14”W x 32”H. With 3 cabinets, a door on each side with an open cabinet in the middle.
Thanks so much!
Yes. I can try to do that over the next few days
So generous! Thanks so much!
Hope, I just posted the 48″ plans. Let me know if you have any questions, and I’d love to see how your build turns out!
What size sliding door hardware do I need for
This plans link was not working
Sal,
I’ve updated the link above to point to barn door hardware that is available on Amazon.