
Here are a set of keepsake box plans. I was recently asked to make what I’ll call a medium sized (roughly 11″ long, by 7″ wide, by 6″ high) keepsake box. I wanted this keepsake box to have a little bit of a design element, but to not be too ornamental. I landed on a craftsman style design.
The construction of this box uses just a table saw and a plunge router. It’s helpful to have a dado blade set and a router table, but neither are required.
Tools Required:
- Table saw
- Dado blade set (optional)
- Plunge router
- Router table with fence (optional)
- Straight cut bit, with a top guide bearing
- Chisels
- Sandpaper or sanding block
- Strap clamps
- Wood glue
Materials
- 11″ x 7″ x 5/4″ (aka, 1 1/4″) – for the top
- 36″ x 5″ x 5/8″ – to cut the four sides from so the grain is continuous
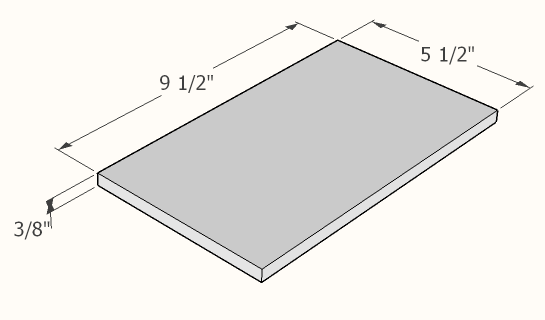
- 9 1/2″ x 5 1/2″ x 3/8″ – for the bottom shelf.


Step 1: Cut the sides
The four sides for this box are cut on the table saw from the 5/8″ material. For the best look, you want to cut it so there is a continuous grain running around the entire box. This means that you’re going to cut one of your short sides first, then a long side, then the other short side, and lastly the second long side. You’re also going to want to keep the same side of the board as the outside. This means you’re not flipping the board over with every piece. You’ll wind up with a little more waste, but the finished product will be better.


Step 2: Detail work on the sides.
Now is also a good time to do the 3/8″ wide by 1/4″ deep dado. Set your table saw fence so that the cut will be 1″ up from the bottom of the sides. Note that your dado stack will most likely throw of the measurement the ruler on your table saw, so be certain to measure by hand. If you don’t have a dado stack, you can make a multiple passes on your table saw with the standard blade, moving the fence approximately 1/8″ at a time.
Now that you have the sides cut to length, the next step is to route the arch in the bottom and the inset in each of the faces. Use a 1/2″ straight cut router bit to make all of these cuts. The arches are set 1 1/2″ in from the outside edge, and are 1/2″ deep. The “rails” are also 1 1/2″ wide. The “stiles” are both 3/4″ high, but note for the bottom stile the 3/4″ is from the top of the cut out.
I like to make a template to use with your plunge router and a bit with a guide bearing to make the insets on the faces of the sides. Using the router will mean the corners will be rounded, but this is easy enough to clean up with a chisel after you are done.


Step 3: Cut the bottom board and top.
Cut your 3/8″ stock to the final dimension of 9 1/2″ x 5 1/2″, this will be your bottom. Cutting it to size is all you need to do.
For your top, cut your 5/8″ stock to the 11″ x 7″ dimensions. Now set your table saw blade to a 20 degree angle, and set the fence 3/4″ from the blade. I recommend using a table saw fence extension to give a higher hall to hold the top piece to as you pass it over the saw blade to make the bevel on all four sides.
Now that the bevels are cut, it’s time to go back to your dado stack. We want to to create a 7/8″ wide x 1/2″ deep rabbet on all four sides of the lid. This inside recess will allow the lid to friction fit closed inside of the box. Since my table saw can’t handle a 7/8″ dado stack, I set up about a 5/8″ stack and like to use my sacrificial so I can recess my dado stack into the fence by about 1/8″ of an inch to start, then I move the fence out about 1/4″ and make a second pass. This should give me a recess of about 3/4″ on each side. I’ll then dry fit this on the dry assembled sides to see how much more I need to take off, and I will keep sneaking up on the final cuts to ensure I have a nice tight fit.


Step 4: Assembly
Now that you have all of the pieces cut, it’s time to assemble. The assembly for this box is pretty straight forward. Use wood glue and some braces to hold the first three sides together, then slide in the bottom. Do not use glue on the bottom, as you want it to be free floating to account for any expansion and contraction of the wood. Then glue on your last side and tighten the entire piece down with a strap clamp and measure for square. Make any necessary adjustments, and tighten the strap down.
Step 5: Finishing
That’s it for construction. Once your glue dries, it’s time to sand and finish as you see fit. If you used a good hard wood, a little linseed oil should be a great way to finish this box.
If you have comments or question, please feel free to connect with us via the comments section below or use our Contact Form. We love the feedback! Also, don’t forget to check out our other free DIY plans.

* This post may have affiliate links, which means I may receive commissions if you choose to purchase through links I provide (at no extra cost to you). As an Amazon Associate I earn from qualifying purchases. Thank you for supporting the work I put into this site.
Discover more from Famous Artisan
Subscribe to get the latest posts sent to your email.