
Here are some simple DIY plans for making a table top with breadboard ends. These free plans are easily adapted for different lengths and widths, and can also be adjusted for both indoor and outdoor tables with minor adjustments.
Required Lumber
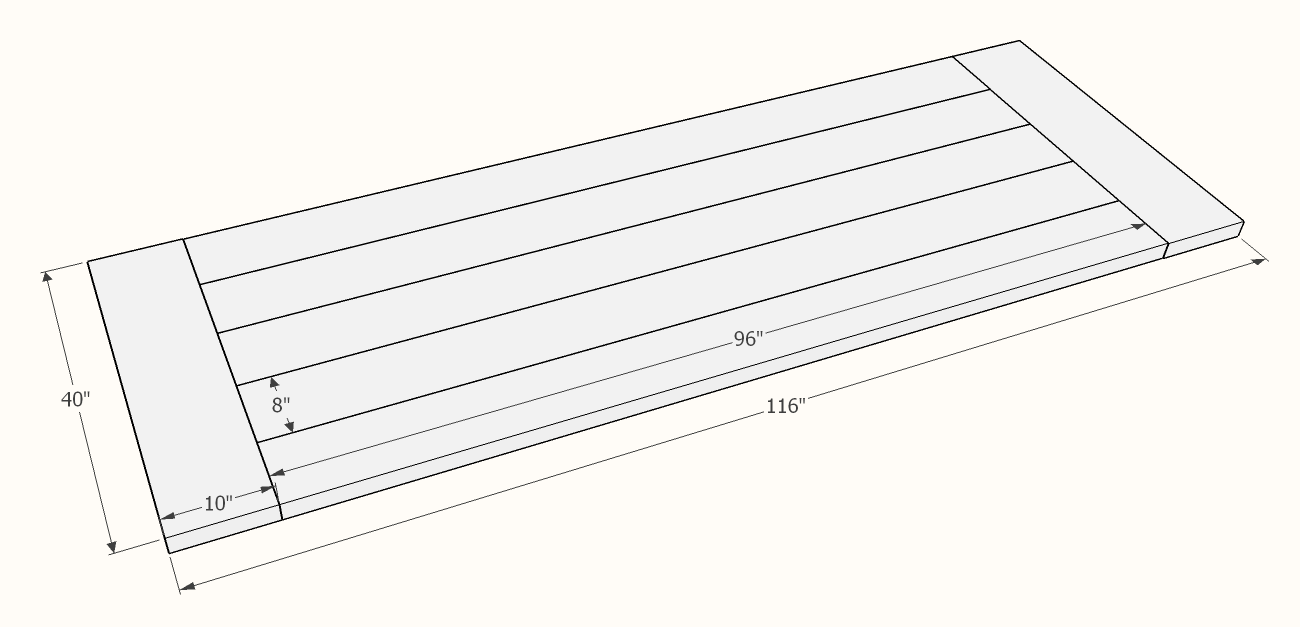
- 5 – 2″ × 8″ x 8’
- 1 – 2″ × 10″ x 8′
Tools
- Tape Measure
- Saw – Circular,or Miter Saw (preferred)
- Drill
- Doweling Jig, Mortise Mill, or Kreg Jig
- Square
- Sand paper or sander
- wood glue

Step 1:
The first step in building a breadboard end farmhouse table top is to join the five 2×8 boards together. For best you’ll want to ensure the edges you are joining are all straight and true. Any warps or besides in the boards are going to create gaps, or at least give you fits when trying to join the boards.
There are several ways you can join the boards, including but not limited to:
- Using a Kreg jig from underneath. This is probably the simplest and quickest method, but also my least favorite due to all of the holes left on the underside of the table.
- Use dowels or loose tenons at set intervals down the length of each edge joint. This is one of my preferred methods, as I typically use my Mortise Mill to drill out the mortises for the loose tenons. This method tends to keep the top of the boards better aligned, resulting in less sanding to create a smooth transition between boards.
- Another method I like to use, particularly when doing table tops with breadboard ends, is to use a spline that runs the full length of the table. This method entails creating a 3/4” deep dado down the full length of each edge being joined. I typically create either a 1/4” or 3/8” dado, depending on the actual thickness of the wood. Then simply insert and glue your hardwood spline. This method uses more material than doing simple loose tenons, but creating the dados goes much faster than drilling all of the mortises, and I usually have enough scraps lying around the shop that the extra materials needed is immaterial.
Note: For each of these methods you’ll also want to use a liberal amount of quality wood glue.
Step 2:
Once you have your long boards joined and the glue has set, you’ll want to ensure the short edges are perfectly straight and all of the board ends are perfectly aligned. I typically cut off about 1/4” from each end with either a table saw or circular saw (ensure you are cutting at a 90 degree angle if using a circular saw).
Step 3:
Now it’s time to cut the 2×10 pieces to the same length as the width of your table (this would be 40” in the example provided here), then attach them using one of the methods listed above. For the breadboard ends, I prefer using loose tenons over the full length spline for two reasons. One, using the full length spline method for the breadboard ends means you would see the spline ends exposed on the sides of the table. Two, I use 3” loose tenons, which means I have 1.5” of wood embedded in each piece instead of just 3/4”.
Once you the breadboard ends affixed, the last steps are finishing the top with sanding and staining, waxing or oiling.

* This post may have affiliate links, which means I may receive commissions if you choose to purchase through links I provide (at no extra cost to you). As an Amazon Associate I earn from qualifying purchases. Thank you for supporting the work I put into this site.
Discover more from Famous Artisan
Subscribe to get the latest posts sent to your email.