
Cornhole boards are a great simple project, and these free DIY plans for cornhole boards will give you the step by step instructions you need to feel confident you are building them right. These cornhole board plans are designed to meet ACL regulations (4″ high in the front, 12″ high in the back) and are the standard design that you will see in most quality cornhole boards at tailgates, parties, etc…
If you are looking for similar plans, but ones that are a little more manageable to move around (we all know cornhole boards can be heavy), check out our lightweight cornhole board plans.
If you have any questions about building your own cornhole boards, feel free to reach out to us through the comments section below. If you do build your own using our plans, we’d love for you to show off your finished product by sending us some pics and telling us how your build went through our submit your build page.
Tools:
- A saw: circular, miter, or table saw. Or a hand saw if you are really ambitious.
- Drill/driver
- 6″ Hole saw, router, or jig saw
- Some sanding blocks
Materials
- 2 – 24″x48″ sheets of 3/4″ birch plywood
- 4 – 48″ 2x4s
- 4 – 21″ 2x4s
- 4 – 14″ 2x4s
- 4 – 3/8″ 4″ lag bolts, and nuts
- 8 – cornhole bags (Well, these aren’t really required to build your cornhole boards but they are required to play the game. There are tons of options for bags out there, but I really do like the ones that have a “slidy” duck cloth side and a “sticky” microfiber suede side as they add a little extra element of strategy to the game. These might not be regulation because of colors – but does that matter when you’re playing in your backyard or at a tailgate?)
Step 1: Cut your cornhole board material
Cut all of the materials to size. For the 3/4″ plywood, you can save a little money (per foot) by buying a 4×4 sheet and cutting it yourself. If you don’t have a table saw or circular saw to make the cuts yourself, your local big box store should have some pre-cut pieces in the lumber section.
Cutting the 2x4s is pretty straightforward, and is easiest accomplished on a miter saw. However you’ll want to ensure to plan your cuts ahead of time to use your materials as efficiently as possible.
Step 2: Cutting the hole.

I like to cut the hole before I secure the 2×4 frame. Measure down 9″ from the top, and 12″ from the side – this is the center of the hole. I find the easiest way to cut the hole is with a 6″ hole saw. An alternative method is using a router with a straight bit and a circle cutting router jig.
Though I realize not everyone has a 6″ hole saw or a router, so I’ll provide an alternate method. Draw a 6″ diameter circle, with your mark measured above as your center. You can use a compass, a ruler, a piece of paper with a thumbtack in the middle and a hole for a pencil 3″ out from the thumbtack, or a 3″ piece of string to draw this circle (or many other methods). Once you have your circle, drill a 1/2″ hole on the inside edge of the circle. This will allow a starting spot for a jig saw. Now just follow the inside of the line all the way around the circle. You may have to follow up with some sand paper to smooth out the edges of the circle.
Step 3: Attach the frame

Once you have the top ready, the next step is to attach the 2×4 frame. This is fairly easy and straightforward. You’ll attach one 48″ 2×4 to each long edge of the top, and one 21″ 2×4 piece to each short edge. You can attach the 2×4 frame to your cornhole board top a few different ways.
- You can pre-drill pilot holes through the top, preferably with a countersink drill bit, and then screw through the top with 2″ wood screws. This leaves the screw heads exposed on the top of the board which you’ll have to fill in later.
- You can use glue and pocket screws to attach each piece individually from underneath, leaving no exposed screw heads
- You can assemble the frame first (attaching the long pieces to the short pieces using 3″ wood screws), and then use glue and pocket screws on just the long pieces (3 per side).
- You can assemble the frame first (attaching the long pieces to the short pieces using 3″ wood screws), and then simply glue the top down using a high quality glue or construction adhesive
For most of the cornhole boards I build, I use method #2 above. It takes a little longer in the construction, but I find it takes much less time in the finishing work to hide the screw heads. I have also been known to use method #1, and then come back with a piece of hardwood laminate and contact cement to cover the entire top as well as all four sides so that I can stain the piece and give the appearance that it is made out of one solid piece of wood.

A good tip for keeping your corners tight when building your frame is to use a clamping block – a scrap piece of wood with square corners, clamped to the both pieces you are screwing together. See the picture to the right for a visual.
Step 4: Build and attach the legs
This is probably the most complicated step, as you have to cut two half circles, as you can see in the diagram to the right. I provide fairly exact measurements in the diagram based upon my own experience and set up jigs. I actually recommend letting the legs run longer than shown, and then following the steps below to determine the proper final length.
Cut your 2×4 pieces to about 14″ in length, this will give plenty of excess to cut off after the legs are attached and measured. DO NOT CUT THE ARCS YET. Now, draw a line down the center of each length (approximately 1.75″ from each side). Put the cornhole board on a table upside down, and position the legs into the the top corners of the frame where they will be attached. Now, transfer that center line to the 2×4 frame, and measure another 1.75″ down from the top of the 2×4. This is where you will drill a 3/8″ hole, all the way through the frame and the leg at once.


Once you have the holes drilled, now you will need to cut the arc around the hole to allow the leg to rotate inside of the frame. Use a compass, ruler, string, etc… to draw a 1.75″ radius half circle, starting from the center of the hole, and then cut the arc with a band saw or jig saw. Now, you can attach the legs to the frame using the 3/8″ carriage bolts. You may have to either spin them through the holes, and then use a hammer to fully sit the bolt head flush against the outside of the frame. Once inserted, temporarily secure with a matching washer and nut (wingnuts allow you to tighten with your fingers instead of needing a wrench).
The last step in the legs is to measure and cut the final length. To do this, place your cornhole boards on a table, right side up, and rest it on cans, boards, books, or whatever so that the top of the back of the board is exactly 12″ off the top of the table – this is ACA regulation height. Now, slide the setup so that one leg extends over the side of the table when rotated to the fully extended position. Use the edge of the table as a straight edge to mark where the legs need to be cut so that the boards rest flat on the ground. Now repeat this process on the other legs of your cornhole boards, remove the legs and cut each leg along the line you drew.
Now, reattach the legs and the construction and assembly are complete!
Step 5: Sand, paint or stain your cornhole boards
This is the fun part, the part where you get to customize your cornhole boards the way you want them. Start filling all holes and scratches on the surface with wood filler. After the wood filler is dry, proceed to sanding by starting with 120 grit sand, and progressing to 180 and all the way to 220 if you want a super smooth surface.
Accessorize your cornhole boards
One of the best things about having your own cornhole boards is making them yours. You can easily paint a custom design on your boards, I opted for some custom vinyl wraps, but there are also lots of other great options to make yours unique. Here are just a few of our favorites:
- A Magnetic scoreboard that easily attaches to your board.
- Free standing scorecaddy with built-in drink holders
- How about taking to a whole new level with some LED hole lights for your board?
- Or maybe LED board lights for around the outside?
However you choose to customize your boards, we hope you’ll share your designs with us by sharing a few pics and letting us know how your build went.

* This post may have affiliate links, which means I may receive commissions if you choose to purchase through links I provide (at no extra cost to you). As an Amazon Associate I earn from qualifying purchases. Thank you for supporting the work I put into this site.
Discover more from Famous Artisan
Subscribe to get the latest posts sent to your email.
I’m ready to tackle the Cornhole set. The legs will definitely be the challenge for me. Would it work to cut two 45 degree angles instead of cutting an arc (a pointed end rather than rounded end)? would the legs still fold in OK?
Cindy, if you are not confident in doing the arcs for the legs you can opt to do two 45 degree cuts on the end of each leg instead. In the image I added below, imagine the blue lines are the uncut 2×4, and the red lines are the 45 degree cuts. By cutting these two cuts, you almost have the same profile as the arc. If need be, you can also smooth over with some sand paper for the necessary clearance.
I hope the build goes well and you share some pictures with us when it is done!
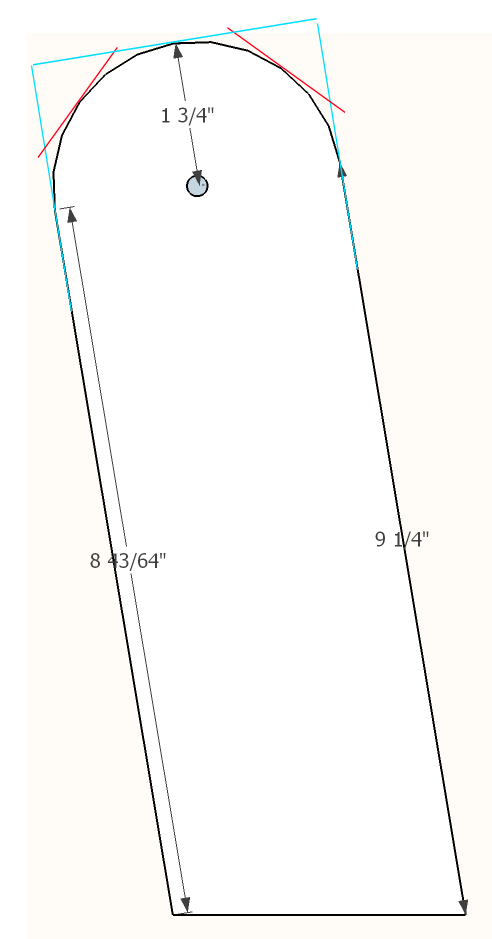
Should the bottom of the legs be angled at all, or just straight cut?
Amanda,
Yes the legs need to have an angled cut on the bottom. The cut can vary slightly based upon exactly where you drilled the holes. In general, they need to be 8 3/4″ on the short side, and 9 1/4″ from the center of the hole on the long side to get the right angle.
Just finished up my boards. Thanks for sharing these instructions! Super easy to follow and construct!
I’m ready to do this, but my only concern is how to make the board so the bags slide smoothly on the board? Do I need to top it off with polyacrillic?
Chris, starting with smooth plywood is the best thing. Then sanding with 180 grit sandpaper to make certain it is smooth is important. After sanding you can paint or stain, and finish with a polyacrylic if you want. I’ve known plenty of people who just left the paint and the bags slid fine.
Another option is vinyl wraps. You can get some amazing designs with vinyl – but the bags REALLY slide with vinyl.
How many pocket screws do you suggest for holding the top? If I purchase a vinyl wrap do I need to do any of the sanding to the top?
Melanie, I would use 6 pocket hole screws on the sides, and four on the top and bottom edges.
And if you do vinyl, you absolutely need to sand to at least 120 grit. The vinyl will show all of the imperfections of the wood underneath.
Are the legs foldable? If not, could you use a machine screw to make a pivot point and make the legs collapsible?
Jessica,
Yes, the legs are foldable. Since there is only the one carriage bolt going through them, the legs pivot on that point and fold nicely into the frame.
Best place for free plans
Thank you
So easy done in a couple of hours! The best and easiest direction I have found! Thank you so much!
To make lighter could you use 1/4” or 1/2” plywood and asd difference in legs? And still be regulation size?
Jillian,
You can make it out of 1/2″ plywood, but you will get more bounce from the bags. So you’ll need to run a 2×4 (or at least a 1×2) under the middle of the board to reduce that bounce.
You could also use 1x4s for the frame and the legs, but you may also get a little more movement of the entire board when the bags hit. The weight of the board helps keep it in place.
What length pocket screws??
For a 3/4″ plywood top you would use 1 1/4″ pocket hole screws.
ACA regulation height is 4” at bottom not 41/4”.
Todd,
You are correct about the ACA requirements of 4″ at the bottom. However when you figure in the geometry of the board tilting at roughly 9.5 degrees, neither 1/2″ or 3/4” plywood on top affixed to the top of a 2×4 will actually meet that exact 4″ requirement. To land as close as possible to 4″ you would actually need plywood at 9/16″ thick”.
Personally, when I make my boards I actually trim about 1/8″ off one end of the 2×4 in order to eliminate the rounded corners to provide a flat edge for the plywood to rest on. This brings the bottom edge height almost exactly to 4″ when using 3/4″ plywood.
Confused by your materials list. Why 2 – 28″ X 48″ plywood boards when the plan only calls for one of those?
Bob,
Listing 2 sheets of plywood is to account for the fact you are going to want to make 2 boards. You’ll need one 24″ x 48″ sheet of plywood per board.