
Here are the flip top tool cart plans which detail exactly how to build a cart exactly like the one we showcased in our DIY flip top cart for miter saw and planer post. Of course, these flip top tool cart plans were designed with our own tools in mind. Before you get started you will want to measure your tools to ensure the size of the cart will fit your needs, and make any adjustments needed.
We also have a set of flip top workbench plans that add a work surface that doubles as a planer outfeed. Those DIY plans also include a second flip top for a single tool that adds even more outfeed capacity.
Tools
- Saw – table, circular, or miter
- Drill / Driver
- Wood glue
- Tape measure
- Square
Materials
- 2 – 2″ x 4″ x 8′
- 2 – 2″ x 4″ x 10′
- 1 – 2″ x 6″ x 6′
- 1 – 2′ x 8′ x 3/4″ plywood
- 4 – 3/8″ x 6″ eye bolts
- 4 – 3/8″ x 2″ bolts
- 4 – 3/8″ washers
- 4 – 3/8″ lock nuts
- 4 – knobs
- 1 – 3/4″ x 32″ threaded rod
- 4 – 3/4″ nuts
- 4 – Rockler casters
- 2 – 3/4″ washers
- screws
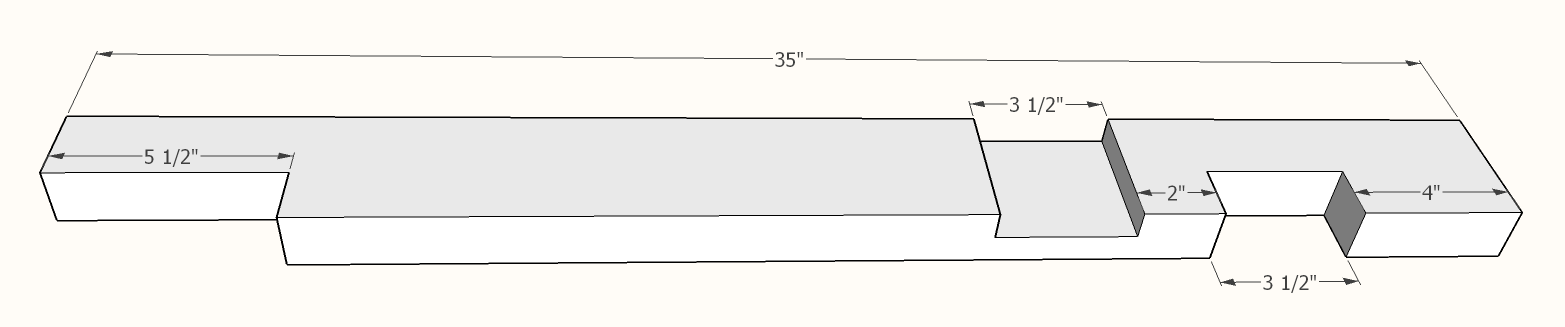
Step 1: Cut the four outer legs
These flip top tool cart plans utilize 2x4s, doubled up, for the legs. Which means there are eight 35″ pieces in total – four “outer” legs and four “inner” legs. To be fair, “outer” and “inner” are misnomers. Two of the outers are inners and two of the inners are outers, but that just makes things confusing. So to maybe make things a little clearer, you’ll need to cut four pieces as shown in the diagram below. These cuts are most easily made using a dado blade on your table saw, but if you don’t happen to have a dado blade or a table saw, you can accomplish the same cuts using a circular saw to make repeated kerf cuts and then a chisel to clean up the dados.

Step 2: Cut the four inner legs
Now that you have the four outer legs cut, it’s time to cut the four inner legs following the diagram below. If you pay close attention, the only real difference is what side the 3/4″ deep dado that runs the full width (3.5″) of the 2×4 goes.
Step 3: Cut cross braces and build the base structure
Now it’s time to cut the cross brace and stretcher pieces, and put it all together. Use wood glue and 2 1/2″ wood screws to attach all of the pieces. They should be assembled as shown in the third image below. Note: If you’ve adjusted these designs to accommodate wider (or narrower) tools, you’ll want to adjust the length of the 33″ stretcher pieces to allow for the usage of a wider top.
You’ll notice in the first image below, the outer legs have the 1 1/4″ deep slots for the bolts already cut. You can do these slots either before or after you’ve started assembling the separate pieces, but take note – two of these slots are on the inner legs, and two of the slots are on the out legs. I personally don’t like cutting these slots until after I have the legs glued up. Not messing up and cutting the wrong side is one reason, but there is also only about 1/4″ of material left in the 2×4 after you cut the slot so it can break very easily.
Once I have the legs built, I then use the table saw to cut the dadoes 2 9/16″ down from the top of the legs. I also cut the dadoes in the 2×6 boards while I have the table saw set up to ensure they are at the exact same place. You could, of course, wait until after you have the entire base assembled and then use a circular saw and a chisel to cut these slots.


Step 4: Build the top
The top consists of three layers of 3/4″ material and has a finished size of 24 x 25″. This size leaves about a 1/2″ gap on each side of the top to ensure you have plenty of clearance to rotate the table. Remember though, we sized this cart specifically for our tools – so if you need yours slightly wider or narrower, you’ll have to adjust your pieces here.
The top and bottom layers, or outer layers, are simply cut to 24 x 25″ rectangles. Each out layer has two step holes drilled into the corners, 1″ from the front/back edge (the 25″ long sides), and 1 1/2″ from the side edges (the 24″ long sides). For the 7/8″ holes in the top and bottom boards, you want to drill these about 3/8″ deep. Then you want to drill the rest of the way through the center of these holes with a 3/8″ drill bit. These two-step holes will allow you to countersink the 1 1/2″ bolts which hold the eye bolts in plans so that the ends do not protrude from your top.
For the middle layer, you’ll need to cut two pieces to be 25″ x 11 5/8″. When combined, these two pieces wind up 3/4″ shorter than the outer layers you just made. This 3/4″ difference will serve as the channel for the threaded rod. On the outer two corners of each of these middle layer pieces, you’ll also need to cut out a 2″ x 1 1/2″ rectangle. This space will allow for the eye bolt, which turns into the locking mechanism, to sit.
Before gluing your top together, now is a good time to dry fit the pieces – including the 3/4″ threaded rod. The rod should fit snug in the 3/4″ x 3/4″ channel you have created. You don’t want it so tight that it cannot turn at all, but you also don’t want it to be sloppy loose. If either of these scenarios are happening, you can adjust the width of the channel by moving the sides of the middle piece in and out just so slightly. This should provide just the right amount of play and resistance for the threaded rod.


Step 5: Final cart assembly
Now that you have your base and your top built, it’s time to put it all together. Start by inserting the threaded rod through one side of the cart base, then all the way through the top, and out the other side of the cart base. Put a washer and two nuts on each end of the threaded rod. The inner nut should be snugged up close to the washer and the outside of the cart base – but you don’t want to tighten it down against the base otherwise the top won’t rotate freely. Instead, tighten the inner nut against the outer nut and combined the two should lock each other into place and prevent the threaded rod from moving laterally.
The last step is to put the eye of an eye bolt in each corner of the middle layer of the top, and then secure it in place by putting one of the 2″ bolts through the eye of the nut and tightening them down. The eye bolt should still rotate freely, allowing you to slide it through the slot cut in the legs, where you can then put a washer and the knob on the end of the bolt. These four eye bolts now act as a means to lock the top so it does not rotate. When you are ready to flip your cart, simply loosen the knobs, slide out the eye bolts, and then rotate away!
Of course, you can also attach casters to your tool cart if you need it to be mobile. Our carts typically use the Rockler Workbench Locking Casters.
Step 6: Attaching your tools
Of course, these flip top tool cart plans wouldn’t be much good if we didn’t at least give you a helpful tip about attaching your tools to the cart. So the best tip we can provide you for attaching your tools is to start by finding the lateral center of balance for each of the tools you’re planning on attaching. The easiest way we found to do this was to lay the 3/4″ threaded rod on a large flat surface. Then, set your tool on top of the rod in the same orientation that the tool will sit on the flip top cart. Move then tool forward and back until it balances on the rod, and use a black marker to make a line on each side of your tool directly above the middle of the threaded rod. This is your tool’s center of balance, and should be positioned directly over the threaded rod when you are attaching it to your top. By doing this with both tools, you’ll help ensure that your top rotates easily without trying to whip itself around and possibly injuring someone.
We hope you found these flip top tool cart plans useful. Please provide us feedback in the comments section below if you were able to build your own cart based on our instructions.

* This post may have affiliate links, which means I may receive commissions if you choose to purchase through links I provide (at no extra cost to you). As an Amazon Associate I earn from qualifying purchases. Thank you for supporting the work I put into this site.
Discover more from Famous Artisan
Subscribe to get the latest posts sent to your email.