
If you have ever been interested in working with green wood, you’ve probably also gained some interest in having a shaving bench. Building a shaving bench is much easier than it may seem – but there are a number of ways to do it. There are versions with both single swinging arm that comes through the middle of the seat. There are versions with two swinging arms, one on each side of the plank. There are old school versions made from a green log themselves; and there are versions such as Tom Donahey’s which can be made almost entirely from a single 2x10x10.
Our shaving bench plans below are definitely not for a light or elegant shaving bench. In fact, these plans may be on the slightly “overdone” side of shaving benches. But I’ve designed them that way on purpose, as my current workshop doesn’t provide many options for a fully functional workbench. So I’ve designed this shaving bench to work as a low work bench where I can also hand plane small parts.
The first major noticeable difference in our shaving bench and traditional shaving benches is that I’ve incorporated four legs instead of the traditional three – and mine are made of 4x4s. Having four solid corners should give me a little extra stability for some of the additional uses I’m envisioning. Though the design could easily be adapted to just a single front leg like a traditional shaving bench by attaching the third to the front of the plank.
Tools Required
- Saws – circular, miter, and table saw all come in handy
- Drill and driver. A drill press is really nice to have on this one for the bench dog and holdfast holes.
- Router with straight bits, or chisels and a lot of patience.
- Exterior wood glue
Materials Required
- 2 – 2×10 @ 6′ (or, a solid piece of 3″ x 10″ @ 6′)
- 2 – 4x4s @ 6′ (or one 4×4 @ 8′ if you want the bench to sit a little lower)
- 1 – 2×4 @ 8′
- 1 – 3/4″ oak dowel @ 18″
- 1 – 2×2 @ 2′
- 1 – 1×8 @ 6′
Step 1: Cut your plank
Even though a shaving horse has some moving parts, if you break it down into the major components it’s actually fairly simple to build. The first of those components is the plank. This is the major body of the part of the shaving bench and the piece you’re going to be parking your bottom directly on for a fair amount of time. So you may want to modify these plans and add a nice carved (and padded) seat; I’m happy with my utilitarian seat for the time being.
I’ve designed this plank to be a full 3″ thick to allow using holdfasts in the three holes in the guide slot and all of the holes behind the sitting area. From my experience, anything less than 3″ thick doesn’t really work with holdfasts all that well.
To get to the 3″ thickness, you can glue your two 2x10s together or start with rough cut lumber already that thick. From one end, measure somewhere between 36 and 38″ down, and draw a line 1 1/4″ in from the edge all the way to the mark. From the other end, mark 30″ down directly on the edge. Now draw a nice scalloped line between those two points. Do the same on the other side and cut along your lines to create the thinner end. You may also want to spend some time with a spoke shave or sand paper or a router to round over these edges as this is where your legs will be resting.
Now with a 3/4″ drill bit, lay out and drill the three holes in the guide slot. Space these holes 2″ apart, and make certain they are centered on the plank. I drilled my first hole about 27 1/2″ in from the front edge, but you can alter this slightly if you choose. While you’re drilling these holes, also lay out and drill the holes for the holdfast in the seat.
The last piece of the seat you’ll need to cut is the guide slot itself. This slot should start about 3″ in from the front edge and continue all the way to the last hole you drilled. Make the slot 3/4″ wide by 5/16″ deep. A router with a 3/4″ straight bit comes in real handy here.
NOTE: my holdfast holes are 3/4″ because I have a small WoodRiver holdfast with a 11/16″ shank; and my bench dogs are also 3/4″ in diameter. If you have holdfasts with a different shank diameter, drill your holes accordingly.


Step 2: Cut the legs
The next major component to ready are the legs. I’ve designed mine using 4x4s, and as I mentioned earlier, I’ve used four legs in my shaving bench plans instead of the traditional three for added stability.
Cut the legs to 24 1/2″ long, with a 10 degree angle on each end. These cuts should be parallel to each other. You can also just the height of your bench seat by cutting these shorter than the 24 1/2″.
Once you’ve cut them to length, cut out a 3″ x 1 7/8″ notch on one end in order to allow the plank to rest on the legs. Then use wood glue and your fastener of choice to attach the legs flush to the four corners of the plank.


Step 3: Add the Quoin and Platform
The quoin and platform are what you’ll use to rest the piece on which you are working. It also allows you to raise and lower the piece, and slightly adjust the angle of the piece. Therefore, the width and length of the quoin does not have to be exact to the measurements listed below – but you’ll want to ensure the height (4″ in the front) and slope (9 degrees) are close. The other important factor is to ensure your guide rail matches the width and depth of the guide slot you routed in the plank. In this case that is 3/4″, so I used a piece of the 1×6 cut from the platform we’re about to make.
To easily get the slope to match on the outside pieces of the quion, simply cut them from the same piece of material as shown in the image below. If you have enough of the 1×6 left, you can laminate two 10″ pieces together and then cut them as shown.
For the platform, first install a 1 1/2″ x 1″ rest at the front edge of the plank. Then attach a small hinge to the top of the rest and the bottom of the platform. This will allow the platform to move up and down as you slide the quoin forward or back to account for the size of piece on which you are working.


Step 4: Treadle
The last major component you need to make for your shaving bench is the treadle, or swing arms. This is the piece that’s doing all of the work for you in regards to holding your piece down. Building the treadle is actually fairly simple, the swing arms are probably the part that requires the most effort.
Start by cutting two pieces of 2×4 to 36″ in length each. Then round over at least one end of each 2×4. You’re welcome to round over both ends for aesthetics, but it’s really not needed on the top. Once you have the ends rounded over, it’s good use some blue painters tape to secure the pieces together. This helps ensure the holes are perfectly aligned in both pieces.
Now, drill the 3/4″ hole on the bottom, in 3/4″ from each edge. This hole will be for your foot pin. Next, lay out the holes for your handle and your lever pin as shown in the diagram below. All of these holes will be drilled out to 3/8″.
The next piece to cut is your clamp pin. This is a simple piece of 2×2, cut to 7″ in length. The tricky part with this piece is you need to drill a 3/8″ hole all the way through the part. You can also round over the edges a bit, but it’s not completely necessary. The corners help to give it more bite into your work piece.
Time to make the handles. Well, you can either make the handles, or you can start with a pre-made handle and then just add the pin. I prefer keeping mine a little more rustic. I just take a 1″ dowel and cut a 4″ section, then drill a 3/8″ hole for the pin.
Use a 3/8″ diameter pin (this can be a 3/8″ dowel or steel rod), and cut it long enough to insert into your handle and extend at least 3″ out of the end. Glue the pins into the handles.
Now, assemble the treadle around the plank, using a 3/8″ bolt 10″ in length as your lever bolt. Do not over tighten, as you want the swing arms to be able to swing. You also want to be able to adjust the position of the swing arm up and down fairly easily. Likewise, the handles should just slide in to keep the clamp pin in place.
Once you have the treadle installed, your shaving bench is fully ready for use!


Optional Add-ons
Of course, there are some additional optional upgrades or add-ons you can do to make your shaving bench more appropriate for your needs. Below I’ve pictured a simple saw stop.
You could also add on an end vise in place of the saw stop. This is an option that really takes advantage of the bench dog holes.


* This post may have affiliate links, which means I may receive commissions if you choose to purchase through links I provide (at no extra cost to you). As an Amazon Associate I earn from qualifying purchases. Thank you for supporting the work I put into this site.
Discover more from Famous Artisan
Subscribe to get the latest posts sent to your email.
why 3 3/4 holes at guide slot?
distance from front to treadle pivot point?
Thanks
Dave
Dave, the 3/4 holes in the guide slot are for the versatility of the option to use a holdfast on smaller pieces instead of the foot lever. I believe the treadle pivot point is about 14″ in from the front, but need to double check that for you.
Thanks so much for the plans – Distance front front to pivot holes for the shaving bench. You said 14″ but wanted to check that? Ron Roy
Ron,
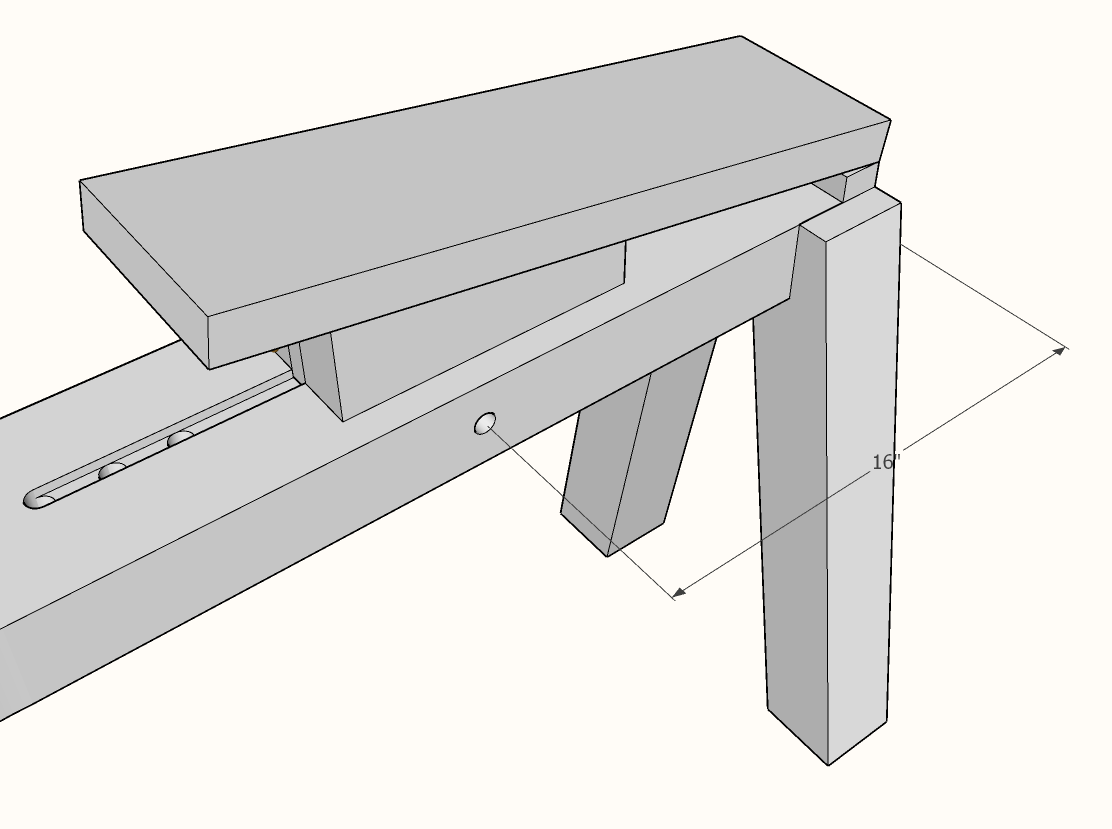
If it is the below hole to which you are referring, it is actually 16″ from the front.