
Here is an alternate build plan to create the exact same look as our other Free DIY Rustic Headboard Plans for a queen size bed. The difference in the build is in the first two steps. Instead of sandwiching a 1×2 inside of the two 1x3s of the legs, in this design you run the planks all the way to the outer edge of the 1×3 legs and then add an additional 1×3 filler strip to the bottom of each leg. So this DIY rustic queen headboard plan actually saves you two pieces of wood and produces a little less waste from the 1×6 boards.
You should be able to complete this entire headboard in one weekend, if not in just one afternoon (minus the finish work).
Required Tools:
- Saw: miter saw, circular saw, table saw, or even a hand saw
- Hammer or nail gun
- Wood glue
- Sandpaper
- Paint or stain.
Materials List:
- 7 – 1x3s, 8’ long
- 4 – 1x4s, 8’ long
- 6 – 1x6s, 6′ long
- 1 – 2×4 stud, 8’ long
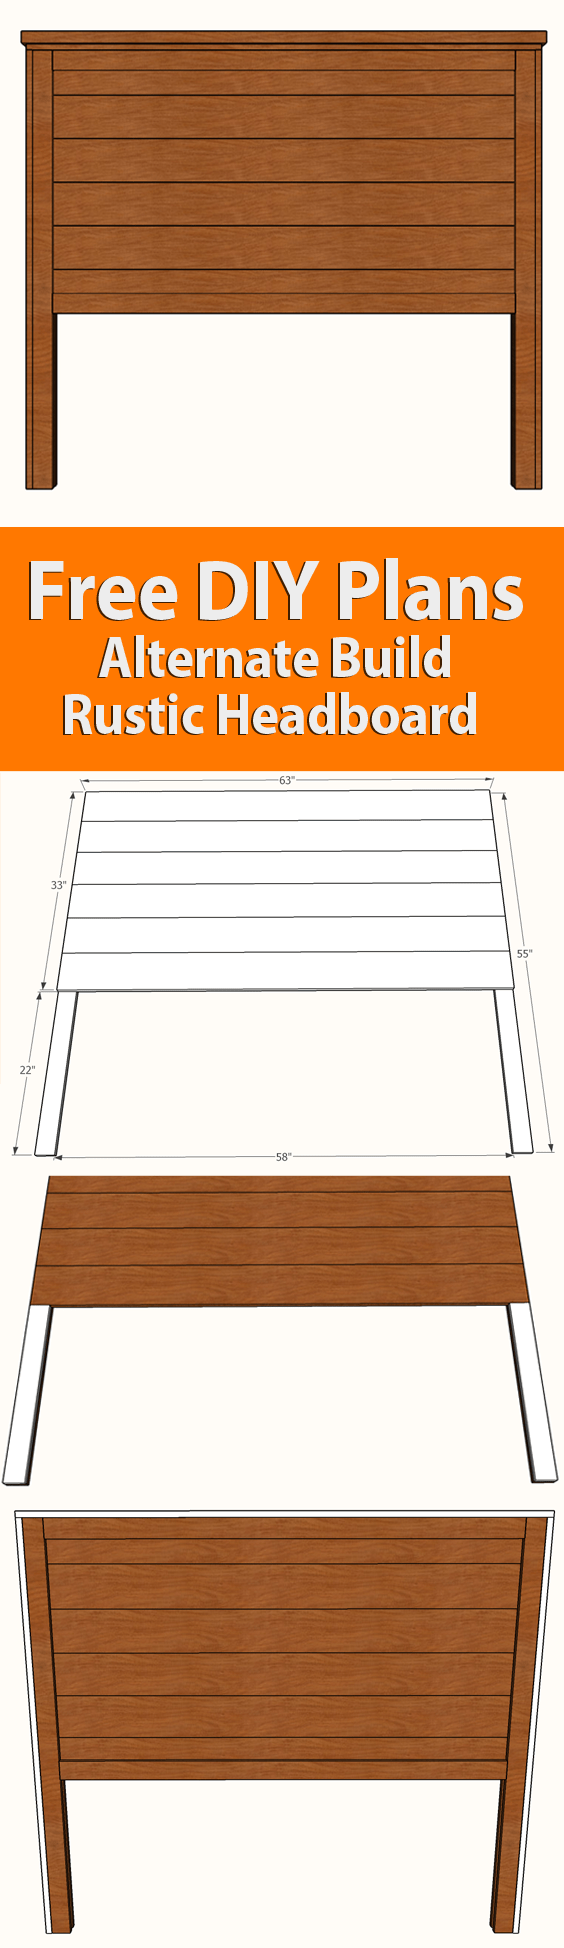
Step 1: Build the legs and layout the planks
The first step in these DIY rustic queen headboard plans is to layout the legs and the planks. This consists of taking two of the 55″ 1×3 boards and attaching the six 1×6 planks, each of which should be cut to 63″ in length. Attach the top board first, ensuring it is flush and square with the top of both legs, and use that as a guide for laying out the rest of the planks. Use wood glue and 1 1/4″ nails or screws going through the planks and into the legs. These fasteners will be hidden later, so no concerns about having to wood fill these holes.
In my drawings I show six 1×6 planks, however you can also use varying widths to give a more rustic look. You just need to go down at least 32″ from the top.

Step 2: Attach fill strip
Attach the 22″ 1×3″ fill strips to the bottom of the legs using wood glue and nails or screws going through the fill strips and into the legs. These fasteners will be hidden later as well.

Step 3: Attach the backs of the legs and the inner trim
Now that you have the planks and fill strips in place it’s time to attach the 55″ 1×3 backs of the legs. Use wood glue and 2″ nails or wood screws. You will have to come back and wood fill these holes later.
After attaching the backs of the legs, now it’s time to attach the four 58″ inner trim pieces – two on the front and two on the back. Here again you’ll be using wood glue and nails or wood screws – but you’ll want to use trim or finishing nails/screws so the holes are easily hidden later. Don’t worry about using a lot of either, as the wood glue is what will be providing the actual bond once it dries.


Step 4: Attach outer trim
You’re now onto the final steps of construction, attaching the outer trim pieces! In this step you’ll be attaching a 55″ 1×3 to the outside of each leg. Note that a 1×3 is actually 2.5″ wide, and your legs should be about 2.25″ thick. This means you can either have a 1/8″ overhang on both the front and back, or you can attach the side trim flush to either the front or back depending on your preference. Use wood glue and finish nails or screws.
Once the side trim is attached, attach the top 1×3 trim board. Again using wood glue and nails (these fasteners will not be exposed).


Step 5: Attach the top rail
This is the last step of construction, attaching the 2×4 top board. This board should over the 1×3 trim board you just attached by 1/2″ on all four sides. Use wood glue and 2.5″ nails or wood screws to attach this board. You’ll have to come back and wood fill these holes later.

Step 6: Sand, stain or paint
This is always the best part – the finishing details to make it your own. Start by sanding the whole piece, progressing through 120, 150, and 180 grit sandpaper (and even 220 if you want an ultra smooth stained surface). You can also add some distressing to the piece now if you want to give it an older look.
Finally, stain or paint it as you choose.
If you appreciated these DIY rustic queen headboard plans, don’t forget to check out our other free DIY furniture plans.
* This post may have affiliate links, which means I may receive commissions if you choose to purchase through links I provide (at no extra cost to you). As an Amazon Associate I earn from qualifying purchases. Thank you for supporting the work I put into this site.
Discover more from Famous Artisan
Subscribe to get the latest posts sent to your email.