
Here is a simple plan for a basic DIY four leg round table that can make a great breakfast of dining table. The plans I provide below include using simple 3/4″ plywood for the top, but one of the beauties of the design of this base is that it lends itself to be used in conjunction with many different table top designs – whether they are round, square, octagonal, or some other similar shape.
Another thing I like about these DIY plans is that they don’t use pocket screws so you don’t have any visible screw holes in the sides of the stretchers and top supports. In fact, the only visible screws you would see are where you attach the legs to the stretchers and these can even be avoided if you wish to venture into mortise and tenon joinery.
Note: These instructions are based on using lumber from a lumber yard. These plans are designed for using actual 4″ x 4″ beams – not the typical dimensional 4x4s you buy from the big box stores which are actually 3.5″ x 3.5″. Of course, you can use the dimensional 4x4s instead. If you do, you’ll have to adjust the plans slightly to account for the difference in width, particularly for the dados in the lap joints for the stretches and the top supports.
Required Lumber
- 3 – 4″ × 4″ x 8’
- 1 – 4′ x 4′ x 3/4″ sheet of plywood
Tools
- Tape Measure
- Saw – Jig, Circular, and/or Miter Saw
- Drill
- Countersink Drill Bit
- Chisel
- Square
- Sand paper or sander
- Wood glue
Step 1: Cut the four legs
![]() This is probably the simplest step of the entire build, particularly if you have a miter saw capable of cutting through a 4×4 beam. Set the miter saw to 5° off square, and cut all four legs to length at 25 25/32″. Note the ends should be cut parallel to each other. And your legs don’t have to be exactly 25 25/32″ long – but they do all have to be the exact same length otherwise your table will be lopsided.
This is probably the simplest step of the entire build, particularly if you have a miter saw capable of cutting through a 4×4 beam. Set the miter saw to 5° off square, and cut all four legs to length at 25 25/32″. Note the ends should be cut parallel to each other. And your legs don’t have to be exactly 25 25/32″ long – but they do all have to be the exact same length otherwise your table will be lopsided.
Step 2: Cut and assemble the stretcher assembly.
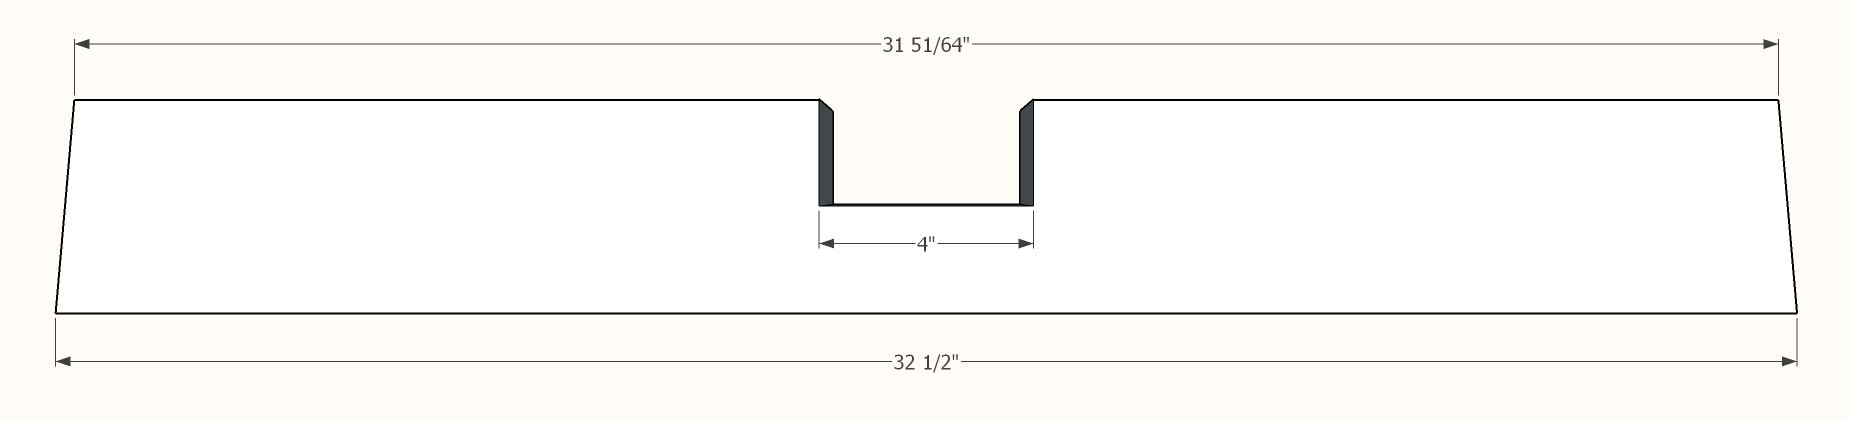
There are obviously other ways to build the stretcher assembly, but I’m a big fan of using a lap joint for stability and since it doesn’t require any visible fasteners. These stretchers are going to have 5° angles cut on each end, however these are not parallel angles. I find the easiest way to cut these is to leave the miter saw set with the 5° angle, and put what will be the bottom of the stretcher against the fence, make the first cut and the FLIP the 4×4 beam so the bottom remains against the fence but the cut will be angled the other direction. Mark out 32.5″ from your first cut and make your second cut.
Once you have both stretchers cut, you’ll need to cut the dados for the lap joint. Note, the dado on one stretcher needs to be on the top while the other needs to be on the bottom so the two boards can interlock. These should also be dead center in the middle of each each stretcher. Unless you have a table saw and a dado blade, the easiest way to make these is by making repeating kerf cuts with a circular saw set at a 2″ depth.
After you have both of these dados cut, the stretchers should slide together into a plus shape. The joint should be tight enough the just wood glue holds it together, though you can opt to use four 3″ wood screws coming up from underneath in a square pattern to ensure these stay tight together.

Step 3: Attach the legs to the stretchers.
The legs now need to be attached to the stretchers, with a 4″ space between the stretcher and the floor. The easiest way to “measure” this 4″ space is by simply laying two of your legs on their sides on your work surface and setting your stretcher on top of them while you use 5″ lag screws (3 per leg in a triangle pattern) to attach the first two legs.
 Optional Enhancement: If you’re like me and don’t like exposed fasteners, you may want to try mortise and tenon joinery here so you don’t have the visible lag screws here. Though this skyrockets the difficulty level for the beginning wood worker. You could also do lap joints here as well if you prefer. Note that if you’re going to decide to do either lap joints or mortise and tenon joinery, you need to make that decision prior to cutting the stretchers!
Step 4: Attach the top supports.
The top supports are built in a similar fashion as the stretchers, just note we’ve reversed the angle of the cuts on the ends to give an eased look to the design. Once these are cut, you can glue the lap joint and use 3″ wood screws to secure from the top, but make certain the screw heads are counter sunk to allow the top to sit flush on the supports.
![]()
![]()
To attach the supports to the leg frames use 5″ lag screws, again ensuring the heads are counter sunk.

Step 5: Cut and attach the top.
The top we show here is simple 3/4″ plywood, cut to a 2′ radius. I typically use a router for this, but you could also use a jig saw or a band saw depending on your available tools and skill level.
To attach the top, there are actually multiple options, I’ll leave the decision up to you.
- Use 4.5″ lag screws through the top supports.
- Use a single baluster screw dead center of both the support and the table top (this is tricky to align, but pilot holes help.
- Put a threaded insert dead center in the top supports and then use a hanger bolt dead center in the top. Similar to above this can be tricky to align perfectly.
- Use only wood glue and 1″ brad or 18 gauge nails through the top.
- Drill counter sink holes and screw from the top, then put in plugs to fill the holes.
There are several other methods as well, but this should give you some ideas to get started.

There you have it, you have a completed DIY four leg round table. The last step is just to finish as desired and enjoy!
I hope you found these DIY four leg round table plans useful. Please leave me comments below if you have any questions, or send me some pictures of your completed DIY four leg round table – especially if you’ve done an alternate top!

* This post may have affiliate links, which means I may receive commissions if you choose to purchase through links I provide (at no extra cost to you). As an Amazon Associate I earn from qualifying purchases. Thank you for supporting the work I put into this site.
Discover more from Famous Artisan
Subscribe to get the latest posts sent to your email.