

A dedicated finishing station can make one of the messiest parts of woodworking much easier to manage. Instead of clearing a bench, hunting for somewhere to set wet parts, or worrying about overspray drifting across the shop, a purpose-built station gives painting, staining, and spraying a defined place to happen.
The best setup depends heavily on the kind of projects you build. Cabinet makers may get more value from a tall drying rack, while furniture builders might prefer a collapsible spray booth. For smaller projects, even a compact turntable can make a surprisingly big difference.
The ten free DIY finishing station plans below cover all of those approaches, from full-size booths to simple accessories that can become part of a larger finishing area. Each comes from a different source, so there is plenty of variety in both design and complexity.
Finishing safety note: Spray finishing deserves careful attention to ventilation, ignition sources, respiratory protection, and the instructions supplied with the finish you are using. Some of these older DIY designs were created for particular materials or workflows. A booth suitable for water-based products should not automatically be assumed safe for flammable solvent-based coatings. Fine Woodworking, for example, specifically limits its simple booth design to water-based finishes.
1. Paint Drying Rack for Cabinet Doors

Overview: Sawdust Girl built this large rolling rack when faced with finishing 39 cabinet doors at once. The design uses a rectangular lumber frame with long horizontal support arms arranged in tiers, plus locking swivel casters so the rack can be rotated as each side fills. One particularly useful detail is that the main frame is screwed rather than glued together, making it possible to dismantle the rack when the job is over.
Why it is great: It provides a huge amount of drying capacity without covering every horizontal surface in the shop.
Link to original plans: Sawdust Girl – Paint Drying Rack for Cabinet Doors
2. Spray Booth for a Small Shop

Overview: Finishing authority Bob Flexner takes a more permanent-shop approach here, explaining the major elements of a proper spray booth and showing how retractable curtain walls can save space. The concept incorporates filters, an exhaust plenum, controlled airflow, lighting, and flexible sidewalls that can be pulled back when the area is needed for another purpose.
Why it is great: The retractable-wall idea lets a serious finishing area share valuable floor space with the rest of a small workshop.
Link to original plans: Popular Woodworking – Spray Booth for a Small Shop
3. DIY Spray Booth Turntable
Overview: Brad Rodriguez of Fix This Build That turns a 24-inch-square plywood panel and inexpensive lazy-Susan hardware into a 360-degree finishing platform. His version uses a 16-inch-square top, a simple raised base, pocket-hole construction, and readily available rotating hardware. The platform can be paired with a small spray shelter or scaled up for larger workpieces.
Why it is great: Being able to rotate a project instead of walking around it helps maintain a more consistent spraying angle while keeping your feet planted.
Link to original plans: Fix This Build That – DIY Spray Booth Turntable
4. Portable Spray Booth and Air Cleaner

Overview: Paoson combines several workshop functions into one substantial mobile cabinet. The upper section becomes a filtered finishing enclosure, while the lower cabinet stores finishing supplies. The build includes an extractor, multiple filtration stages, interior lighting, casters, doors that help contain the finishing area, and downloadable construction information linked from the tutorial.
Why it is great: It consolidates spraying, filtration, finishing-supply storage, and general air cleaning into one movable footprint.
Link to original plans: Paoson – Portable Spray Booth & Air Cleaner
5. Foldable Full-Size Spray Booth

Overview: This Woodcraft design tackles one of the biggest problems with a finishing booth: where to put it after the finish dries. Large cardboard panels create an adjustable three-sided enclosure intended to sit near an open garage door. The walls fold flat for storage, and the article also includes ideas for a benchtop version and a heavy-duty rotating platform for large projects.
Why it is great: Large-project capacity and flat storage make this a smart compromise for a garage shop that cannot surrender permanent floor space.
Link to original plans: Woodcraft – Spray Booths Made Simple
6. Simple Foldaway Spray Booth
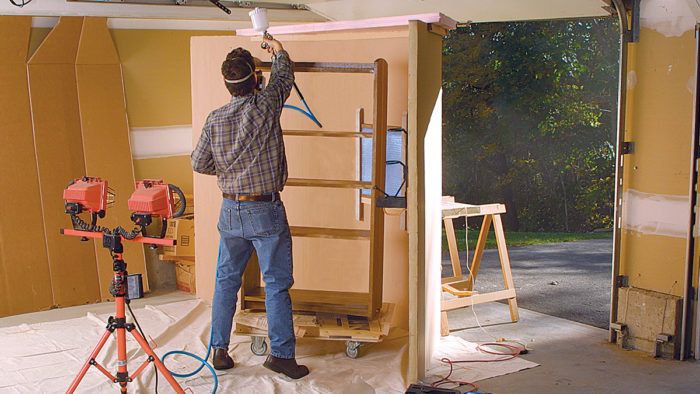
Overview: Jeff Jewitt’s Fine Woodworking booth is assembled from rigid-foam insulation panels with a furnace filter and exhaust fan positioned at the rear. The 4-by-8-foot panels can be trimmed to suit the room, and the completed enclosure folds to less than two feet deep for storage. Importantly, the author specifies that this design is for water-based finishes and warns against spraying flammable materials indoors without purpose-designed explosion-proof equipment.
Why it is great: It creates a genuinely roomy finishing enclosure while remaining light enough to fold away and move.
Link to original plans: Fine Woodworking – Make a Simple Spray Booth
7. Compact Plywood Spray Booth

Overview: This compact cabinet-style booth is only about 30 inches wide, 18 inches tall, and 18 inches deep, making it a useful reference for anyone finishing small projects, models, turned pieces, or hardware. The plywood enclosure incorporates a furnace filter, ducted exhaust, LED lighting, a clear upper panel for additional light, paint storage, and rotating lazy-Susan platforms. A parts list is included at the end of the tutorial.
Why it is great: It packs lighting, filtration, ventilation, paint organization, and a rotating work surface into a very small workstation.
Link to original plans: Resin Car Works – Building a Spray Booth
8. Cabinet Door Drying Rack
Overview: Rogue Engineer’s drying rack is a straightforward lumber build created specifically for cabinet doors and drawer fronts. Long 1×2 arms attach to tall 2×4 uprights at five-inch intervals, while wide feet and plywood gussets stabilize the structure. The original tutorial includes a materials list, cut list, step-by-step instructions, and the embedded build video shown above.
Why it is great: The uncomplicated construction makes it inexpensive, easy to modify, and practical to disassemble after a large cabinet project.
Link to original plans: Rogue Engineer – Cabinet Door Drying Rack
9. Canopy-Style DIY Spray Booth

Overview: Evolution of Style uses a 10-by-10-foot outdoor canopy as the skeleton for a temporary finishing room. Plastic sheeting encloses the sides, rosin paper protects the floor, and filtration and airflow are incorporated around the perimeter. The generous footprint was created with cabinet finishing in mind, and the drying racks are positioned separately from the primary airflow.
Why it is great: A pop-up canopy provides a ready-made framework for builders who need enough room to spray cabinets or furniture but do not want to construct permanent walls.
Link to original plans: Evolution of Style – How to Build a Spray Booth
10. Roll-Up Plastic Finishing Booth

Overview: Old Town Home takes an especially simple approach to temporary finishing space. Clear 4-mil plastic sheeting hangs from the basement ceiling to form a horseshoe-shaped enclosure, while scrap-wood rails distribute the load so staples do not tear through the plastic. A ceiling rail with eye hooks provides places to suspend cabinet doors, and the entire enclosure can be gathered against the ceiling and clamped out of the way when it is not needed. The original article does not describe an exhaust system, so anyone adapting this idea should design appropriate ventilation around the finish being used rather than treating the plastic enclosure alone as a complete spray-booth system.
Why it is great: It is one of the simplest ways to turn an awkward multipurpose shop area into a finishing zone that nearly disappears between projects.
Link to original plans: Old Town Home – How to Easily Build a DIY Paint Spray Booth
A good finishing station does not necessarily need to be a permanent room full of specialized equipment. Sometimes the biggest improvement comes from one well-designed piece: a turntable that keeps your spray pattern consistent, a drying rack that gets wet parts off the benches, or a foldaway enclosure that keeps overspray contained during the occasional furniture project.
For a small woodworking shop, the most versatile solution may be to combine ideas from several of these plans. A collapsible booth, rolling drying rack, and compact turntable together create a surprisingly capable finishing area, while every component can still be stored or moved when the shop needs to return to cutting, assembly, and sanding.
Want more woodworking tips, tool reviews, and project plans? Subscribe to FamousArtisan.com and never miss an update!
Don’t forget to show off your work in our Share Your Build section. We truly appreciate it when people share their work and let us know how our plans turned out for others.
* This post may have affiliate links, which means I may receive commissions if you choose to purchase through links I provide (at no extra cost to you). As an Amazon Associate I earn from qualifying purchases. Thank you for supporting the work I put into this site.
Discover more from Famous Artisan
Subscribe to get the latest posts sent to your email.