
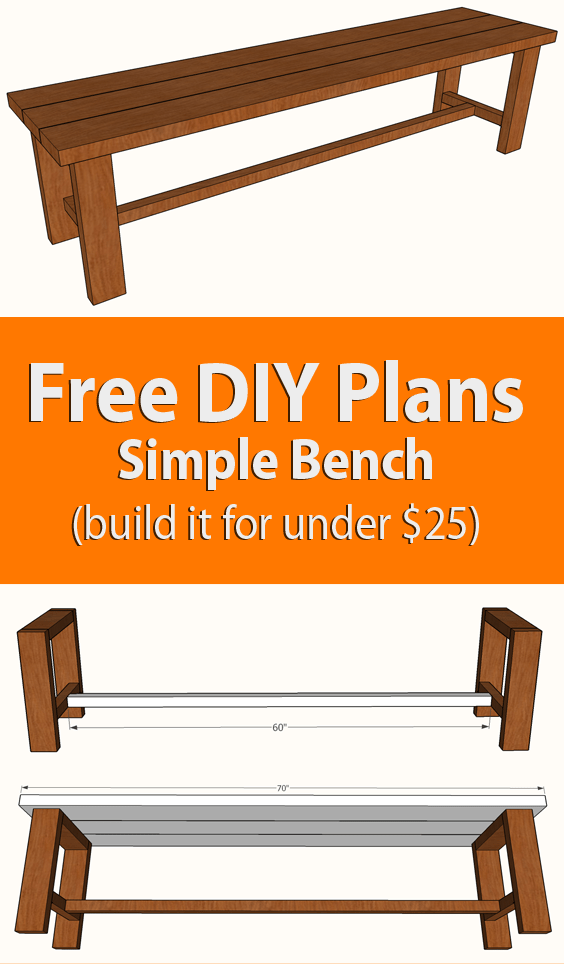
Looking to build a simple indoor or outdoor bench? Want to do it for under $25? These free DIY Simple Bench plans provide the solution to your needs. Using just five boards and a few simple tools, you can have a new simple bench for either indoor or outdoor use depending on the materials you use and how you choose to finish it.
Materials
- 1 – 2×2 x 8’
- 1 – 2×4 x 8’
- 3 – 2×6 x 6’
Tools
- Jig saw, miter saw, circular saw, or table saw
- Drill / Driver
- Tape Measure
- Square
- Sander or sand paper
- Kreg pocket hole jig (optional)
- Pneumatic nail gun (optional)
- Wood glue
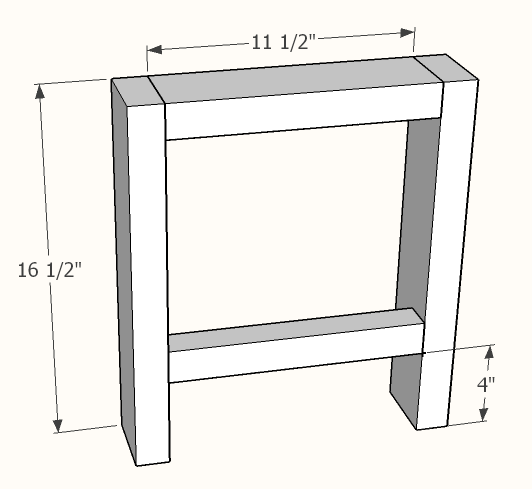
Step 1: Build the leg structures
The leg structures consist of 3 pieces of 2×4, and one 2×2 stretcher. Cut four legs from the 2×4 at 16 1/2″. Cut two cross braces from the 2×4 at 11 1/2″. Cut two leg stretchers from the 2×2 at 11 1/2″ each as well.
To secure the pieces together use wood glue and either pocket screws from the bottoms, or wood screws or nails from the outside. The cross brace should be flush with the tops of the legs, while the stretcher should be fastened about 4″ up from the ground. Note that in this design the cross brace is flush to the inside of each leg structure. You could just as easily center it or put it flush to the outside, however you’ll then have to adjust the rest of the measurements in these DIY simple bench plans accordingly to account for the difference.
Step 2: Attach the leg stretcher
The leg stretcher is a 60″ 2×2, secured in the middle of the 2×2 leg stretchers assembled in Step 1. Here again you want to use wood glue, and either pocket screws from underneath, or wood screws or nails from the outside of the leg structures into the 60″ stretcher.

Step 3: Attach the seat boards
The last step here is to attach the seat boards. These are the 2×6 boards, which each should be cut to 70″ in length. This length will provide for about a 1 1/2″ overhang on each side of the leg structures. Start with the middle board, ensuring to center it on the leg structures. Attach it with wood glue, and you can either use wood screws or nails from underneath or you can drive them down in from the top if you are not worried about them showing.
For the two outside boards, you can use pocket screws to attach them directly to the middle board before securing them down to the leg structures, or you can choose to leave a small gap (1/8 – 1/4″)between the boards. If you are going to use this bench outside, I recommend leaving the gap as it provides a place for water to run off between the boards. These boards can also be secured with good glue and then either screwed or nailed from the bottoms or tops.

And that’s it. You’ve now completed all of the construction steps of these DIY simple bench plans. So it is on to finishing with a light sanding and then painting or staining and sealing as you see fit.
We hope you find these plans useful. Please leave a comment below if you use these or if you have any questions about the designs, and don’t forget to check out our other free DIY furniture plans.
* This post may have affiliate links, which means I may receive commissions if you choose to purchase through links I provide (at no extra cost to you). As an Amazon Associate I earn from qualifying purchases. Thank you for supporting the work I put into this site.