
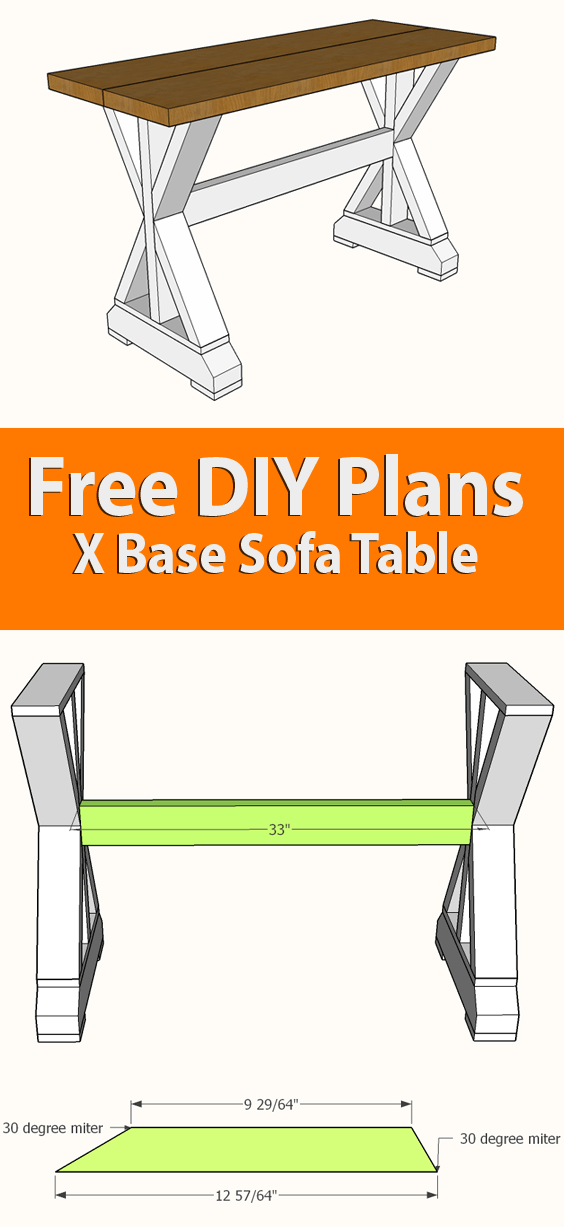
These DIY X-base sofa table plans are a simple way to make your own rustic sofa table or entry way table, and are easy to adjust to any width. I’ve drawn them out for a table that is four feet in length, to make it convenient to use just one 2x10x8′. However, making it longer or shorter only requires changing the length of three boards. The total designed height in these X-base sofa table plans is 29″. You can adjust the height too, but that does require recalculating the angles of the X supports if you are making it shorter. If you are making it taller, you can leave the X supports the same and just have a gap between the top and bottom ones.
Materials
- 1 – 2×10 at 8′
- 1 – 4×4 at 3′
- 1 – 1×4 at 6′
- 2 – 2×4 at 8′
Tools
- Saw (circular, miter, or table)
- Drill/Driver
- Kreg Jig
- Sander and sandpaper
- Hammer/nail gun
- Square
- Tape measure
- Wood glue
- Wood screws
- Brad nails.
Cut List
- 2 – 2×10 at 48″ each
- 2 – 4×4 at 18″ each
- 4 – 1×4 at 14 1/2″ each
- 4 – 1×4 at 3 1/2″ each
- 2 – 2×4 at 22 1/4″ each
- 8 – 2×4 at 12 57/64″, with opposing miters.
- 1 – 2×4 at 33″
Step 1: Cut the 8 pieces for the X supports
This is probably the most complex step of the entire build because you need to make two separate miter cuts. The first miter, the one on the right in the picture below, is a fairly simple 30 degree miter. This is easy with a circular, miter, or table saw.
The second miter, the one on the left in the picture below, still involves a 30 degree miter (so you can leave your saw at the same setting). However, it’s at 30 degrees to the 90 degree rotation. In other words, if you’re using a table saw, you need to set your blade to the same 30 degree angle and then stand your 2×4 on end. Using a miter saw is a little more complicated, as most don’t allow you to make a cut on an angle that steep – at least not safely (so I’m not going to go into that here).

Step 2: Assemble the lower X base
One of the nice things about these X-base sofa table plans, is that using the 1x4s in the design allows you to drive your screws up through it into the upright 2×4 and the bottoms of the X-base supports. This saves you from having to use as many pocket hole screws – which means less exposed fasteners.
Use wood glue and 2 1/2″ wood screws to first attach the 22 1/4″ upright 2×4. Ensure that this board is centered in the middle of the 1×4. Next, again using wood glue, use 1 1/2″ wood screws to attach the bottoms of the X supports to the 1×4. Last, use 2″ wood screws and wood glue to secure the tops of the X supports to the upright 2×4.

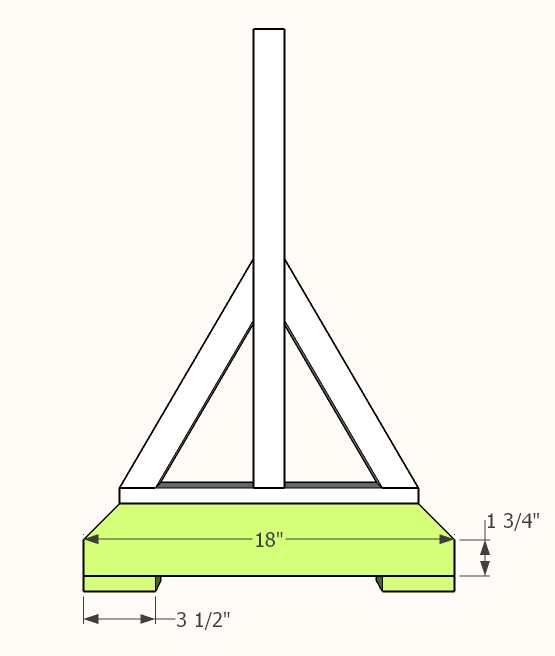
Step 3: Attach the base and feet
Start by cutting your 4×4 into two 18″ pieces. The cut a 45 degree miter on the top of each end, 1 3/4″ up from the bottom and 1 3/4″ in from the edge. Cut four pieces of 1×4 at 3 1/2″ width, and attach with wood glue and brad nails to the outside bottom edges of the 4×4 to form the feet.
Once you have your bases built, use wood glue and brad nails through the 1×4 and down into the base to attach the two sections you just built.
Step 4: Assemble the upper X base
The upper X base is assembled in the exact same fashion as the lower X base; except in reverse. I like to attach my X supports to the upright 2×4 first (as shown in the pictures below). However, you may find it easier to first attach them to the 1×4 and then attach the entire piece to the upright 2×4. Doing it the latter way helps to ensure your X supports are attached to the upright in the correct position.


Step 5: Attach the stretcher
There are two different ways you can attach the stretcher, which one you choose depends on how you want your finished product to look.
Method 1: Use your Kreg jig to create two pocket hole screws on each end of the stretcher and attach to your X bases. This is an easy method, but I personally don’t like the exposed pocket screws.
Method 2: Use two 5″ lag screws from the outside of each X base into the end of the stretcher.

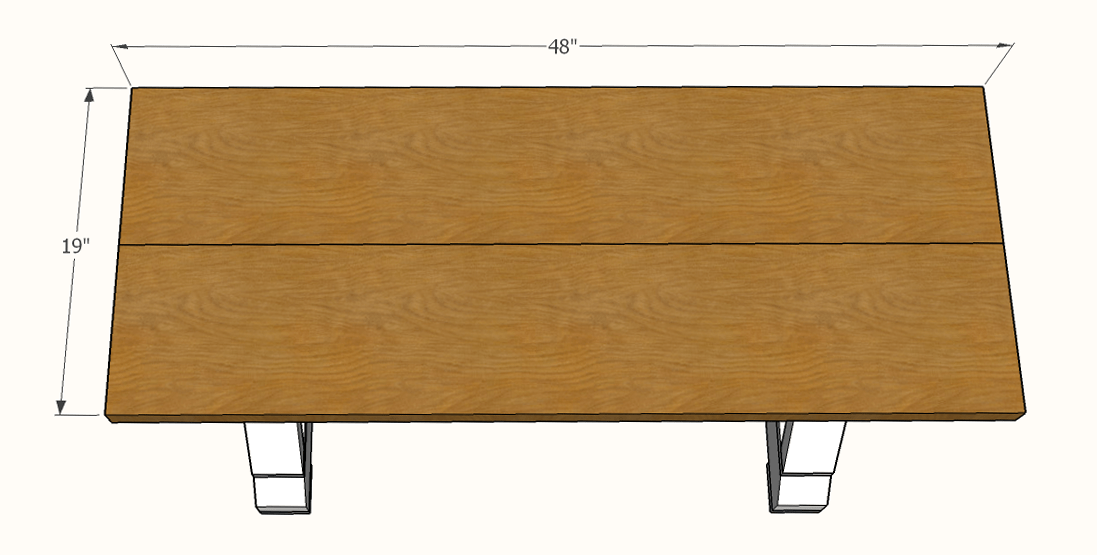
Step 6: Attach the top
These X-base sofa table plans are designed so that you can use a single 2x10x8′ cut in half as the table top. After you cut the 2×10, there’s no need to attach the two boards to each other – simply use wood glue and screws through the 1×4 on the top of each X base to secure the top in place. Of course, you want to ensure you have the boards positioned perfectly before screwing them in. This should mean a 4″ overhang on each end, and a 1/2″ overhang on the sides.
Now that your construction is done, all you have left is to sand, paint or stain, and enjoy!
If you have comments or question, please feel free to connect with us via the comments section below or use our Contact Form. We love the feedback! Also, don’t forget to check out our other free DIY furniture plans.
* This post may have affiliate links, which means I may receive commissions if you choose to purchase through links I provide (at no extra cost to you). As an Amazon Associate I earn from qualifying purchases. Thank you for supporting the work I put into this site.
Discover more from Famous Artisan
Subscribe to get the latest posts sent to your email.